For a pattern, I was looking for a good basic "block". One that I could use again & again with different design details. I wanted sleeves. And a sash. Simplicity 2460 it is. Easy enough. Except for the fact that I only got 1 yard of each of the aforementioned fabrics.Yeah. That wasn't going to cut it. So I turned to my stash. You may remember this fabric from my plans of sewing my own diaper bag (those plans never came to fruitoin...but I did stash the fabric.) Also, this is SO SO long. Sorry about that. I wanted to be very specific for when I sewed this up again. Yes. When. Not if. I love this pattern that much. This is, by far, my favorite dress I've ever sewn for Laila.
Fabric: 2 yards main & 1 of cummerbund & sash. Both are quilting weight cottons.
Pattern: Simplicity 2460
Notions: Thread & zipper
Size sewn: 1, based on DD's chest measurement. The fit is perfect. Which is *almost* disappointing because I was hoping there'd be a little room to grow. :)
Alterations/Design Changes: I didn't cut the middrift on the bias. I figured that'd be cute for a plaid or stripes, but with this print I just decided to save fabric. I also took liberties with the seam allowance. I sewed the sleeves on using 3/8" SA; for whatever reason I just started doubting that they would be big enough. And then I used a 3/8" seam allowance when I sewed the bodice to the middrift...mostly because I was a little less than diligent in transferring my marks so the little cumberbun got caught in the seam line a bit.
Used a 1/2" double fold hem rather than the 2.25" hem that the pattern called for. I just thought that the extra inch or would come in handy :) As it is, the dress hits right below her knee...I might end up adding some contrast trim at the bottom to squeak out a few more months of wear. ;)
Also, the pattern says to install the zipper 1" below the bodice neck. I didn't really want to do a hook & eye so I put the top of the zipper 1/2" below the bodice neckline...pretty much right on the seam line. Worked out just fine. :) And no hook & eye.
Also, instead of gathering the cummerbund, I used elastic thread in my bobbin & shirred it. Then I tacked it down by hand so it wouldn't wiggle around.
 | ||
| Lapped Zipper |
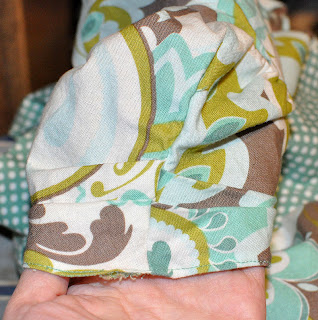
Likes: The design details. The sleeve pleats really polish it off. I think it also is a great design for mixing patterns. Often times I fear that mixed patterns scream home made, but I really love this dress. Love the lapped zipper. Easiest. Zipper. Installation. Ever. And it looks so great. I used this tutorial.
 | |
| Sleeve Pleats |
I'd forgotten how much the Big 4 love basting. I used TON of thread on this dress. While I was sewing the bodice, I started worrying that I might run out so if one was to look at the inside of the dress you'd see 2-3 different thread colors. I also used my over edge foot to finish the seams.
 |
| Gathered cummerbund |
Time to complete: 30 minutes cut/transfer markings (PLUS tracing time, so probably closer to 1 hour). This is so hard to calculate; I never have much more than 15 minutes of uninterrupted time. Let's see....if I were to make this dress for some sort of occasion, I'd want to give myself 5-7 days to complete it. I came in pretty close to 5 days without too much trouble (remember...this is just in spurts. No sewing marathons for this mama).
Techniques learned: Did my first lapped zipper---LOVE IT. Again, very polished.
Total cost:Pattern was $1. Fabric was stashed, though I imagine I originally spent about $25 on the yardage. Plus zipper & (nearly not enough) thread...we'll call it about $30. Way more than I'd spend on a RTW dress, to be perfectly honest. But it got some fabric out of my stash & that's always a win!


Your daughter's dress is absolutely adorable (I'm sure you will come up with something for your son)!! I love the fabric you chose too!
ReplyDelete