Pages

Monday, February 21, 2011

My First Vintage Pattern!

WIth my goals for 2011 in sight, I've been perusing Etsy's sweet Vintage patterns. During my search, I discovered I'm drawn to the late 1950s & early 1960s. There is something about that era that just says "Classic." And while some may find it demeaning, I like the idea of the "little woman" always being put together & presentable.

I also discovered patterns that include views for both slim & full skirts. What a great idea!! So when SewUniqueClassic was offering free shipping, I picked this "instant dress" pattern up. Here are some of the considerations I had when I was shopping & why I settled on this pattern:

Size
I never knew it, but most (all?) vintage patterns come only one size to an envelope. There are tutorials out there on how to grade up/down, but I wanted to get as close to my measurements as I could (particularly in the bust)

Pattern Pieces/Construction
Since vintage patterns have the reputation of assuming the sewer knows more than I do :) I wanted something that had few pattern pieces. With this particular dress, I can envision the necessary steps without seeing the instructions--I think. Hopefully that will help with the construction process.

This dress also has a reasonable amount of pattern pieces. Which is always nice.

Design Details
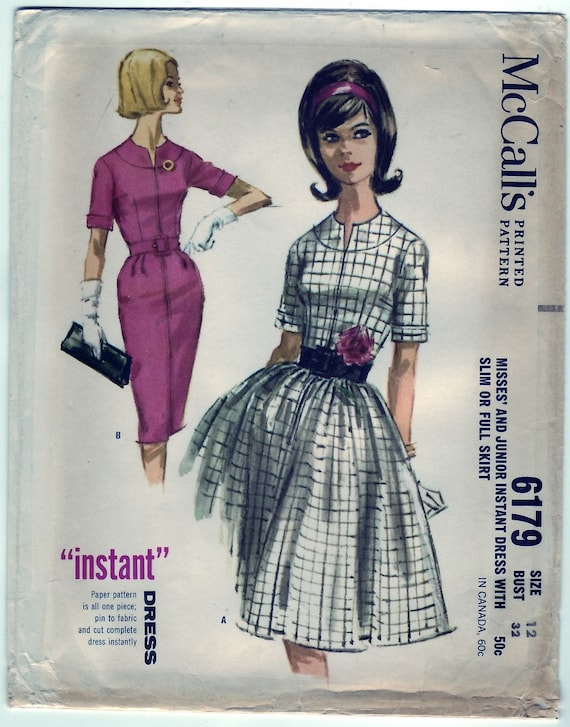
Ah, the belt. Almost all dress patterns from these eras are pictured with a belt. Some require a purchased belt and others instruct to make your own. I have doubts as to how thorough these directions are, but I didn't want to have to find a RTW belt that meshed with my dress. I prefer constructing my own. 

The neckline. I seem to be pretty picky about necklines. I didn't want to mess with a collar, and as much as I love square & scoop necklines that were/are popular, one of my biggest pet peeves are peeking bra straps (though it occurs to me just now that lingerie guards are an easy addition)

The sleeves I found many, many patterns that were sleeveless, but came with a view for a bolero. While I like that in theory-a little ensemble, I find it a little overwhelming. Other patterns included a sleeveless & long sleeved view, which I also considered.

The Concerns
Fit: Women were shaped differently then. Or, rather, maybe it was just the undergarments. The hip measurement for this pattern is 34". Mine is closer to 38". However, the pattern back does say, "If your hip is larger, adjust pattern as shown on Easy Sewing Guide." I will definitely be checking that out.


Closure: It isn't noticeable on the pattern front illustrations, but this dress has a front zipper. It's not something I've ever seen. I was contemplating moving it to the back, but with the dress yoke, it's impossible. I just don't know how I'm going to make it look ok. I mean, it actually kept me up at night. So, the next day, I went back & ordered this pattern, too. Yikes. It's got all the design details I liked about the first one, but with a traditional back zip closure.


Needless to say, I'm implementing a pattern buying ban immediately. :) But fabric purchases are allowed, of course. How else am I supposed to sew up some of these beauties?!

Wednesday, February 16, 2011

Crepe Sash & Piping: Need opinions


If I ever finalize which alterations to do, this is the fabric & embellishments for my Crepe.

Option 1: Fabric on far left for sash with coordinating piping. The piping & sash fabric colors don't match 100%, but I think it can work.

Option 2: Light pink piping with a self fabric tie.

What do you think? Contrasting sash & piping or self fabric tie & matching piping?

Tuesday, February 15, 2011

UFO No longer: Simplicity 4076

Showing DS how to strike a pose...he appears unsure

I started view D back in October. October!!! The construction of this top is very straight forward. Definitely beginner worthy. And I love how it turned out!! No fitting issues & it's so versatile. Nothing like a basic T for this stay at home mom.

So what was the hold up?? Ah, the twin needle. My (mom's) old machine that I was using at the time did ok at the neckline, but the poor thing couldn't handle the 1/4" hems at the sleeves. So, this lil ol' tee got put into a ziplock until further notice.

Being at a standstill with both the Crepe & Pendrell, (and with the help of my new Kenmore!) I decided to bust this baby out & give her a whirl.

Now he's got it!

I had it finished in one evening. My sewing machine handled the double stitched hems pretty well, with the exception of the feed dogs attempting to eat my fabric. That was easily solved with some tissue (as in gift wrapping, not nose blowing) paper.

The only alteration I made was to add 3 inches to the length. I like my casual shirts on the long side, and some of the reviews noted that this top was a bit short. I'm very happy with the results & I will be sewing this one up again.

Monday, February 14, 2011

Because Sewing Just Isn't Enough

I love to sew. Taking a flat piece of fabric & transforming it into a 3 dimensional object with my own two hands is beyond fulfilling.

But it has it's shortcomings. It's a tad intense. I've succumbed to sewing only when the kids are asleep for the time being (and now that the baby is crawling, it's even more important that the kiddos be out of range when I'm sewing away). It's been better for everyone involved.

I found a doll pattern that I wanted to sew up (it's in progress) and the face is embroidered. Since I've never done embroidery, I decided to do some research. I came across the flikr embroidery pool and was blown away. I've never seen such exquisite stitching. This was not the embroidery I knew.  One thing led to another & I found myself at Sublime Stitching. Needless to say, I ordered the "Ultimate Embroidery Kit" and waited patiently for it to arrive.Once it did, this is what I stitched:

Mannequin from Craft-opia Pattern Kit (Sublime Stitches)

I like that I can sit in front of the tv with my embroidery hoop. I like that I'll be able to take it on vacations. I love that I will be able to embellish my sewing projects. It's going to be a great addition to my creative outlet arsenal.

Have you been lead to other crafts through sewing? Did another artsy outlet lead you to sewing?

Wednesday, February 9, 2011

Crepe Muslin 2.1

And here you all thought that we were done with the Crepe muslin. You thought the next you'd hear of it, it'd be fully finished. That's ok. I thought so, too.

So what happened? I tried on my current bodice (the one with the fabric fail). And I couldn't help but think, Could it be better? Could I do better? I decided there was only one way to find out. I looked over my Crepe notes (and posts) and decided what alterations to keep and what additional alterations I'd make.

What stayed the same:
I took in 1/4" from the front pattern pieces
Lengthened the back darts 1 1/2"
Curved & shortened the front waist darts

New Alterations to 2.1
I got up the nerve to chop off my little cap sleeves & do a sloping shoulder alteration on both the front & back pieces. I figured, What's the worst that could happen?  Worst case scenario I'll just go back to muslin number....four? No. Must've been #5, or muslin number 1.2. Confused?? Me too.  After muslin number 4, I went back to my original muslin and tweaked it a bit.

Further Changes
Ugh. The front waist darts look pretty sad. I don't know if it's poor stitching methods on my part, or if shortening them would be the solution. Also, I still feel like the sleeves are slipping off my shoulders, exposing my bra/cami straps. Which I hate. I may add a 1/2" to the neck line. And I may lower the sweetheart neckline.

The Verdict
At first I would have said, absolutely, i's better. But I've been pouring over my muslin photos, and I jsut don't know. For each muslin, it seems like one thing improves while another gets worse. The shoulder wrinkles for 2.1 look the same as muslin 1. This version wasn't was fitted, but it certainly is comfortable. I think I'm just going to have to bite the bullet & move forward. This indecision is driving me nuts.

Thursday, February 3, 2011

A Bit of This & That

I'm almost ready to give the Pendrell another try. Tasia replied to my concerns very thoroughly & it seems that the neckline problem is likely due to construction. Which is a bit of a relief; I was concerned it might be a fitting issue of some sort. Tasia also suggested that I do a mock up of the neck & neckband to practice with, which I thought was brilliant. So once I do that, I'll be off and running with my fashion fabric.

I also received a package from Fashion Fabrics Club in the mail today! This was my first order with them & I didn't have very high hopes. They seem to have some pretty mixed reviews out there. But as for me-I'm very happy with the fabric I received (though I haven't washed it yet) and it arrived very fast. I ordered it less than a week ago! They also offer a thread matching service, so I got a spool of thread, too. I will definitely be ordering from them again.

This is the voile I bought (for my Crepe).


I love it! It's much more opaque than my original Crepe fabric, but I am still planning on doing an underlining. I think I'm going to try to find a dark purple for the sash. I think it will make a very pretty spring dress.

So, you're officially caught up. :) Can't wait to share my finished projects soon!
Related Posts Plugin for WordPress, Blogger...