Pages

Monday, April 23, 2012

Just a quick post...


I've been so busy sewing I haven't had time to blog (and the weather has been so nice we've spent a lot of time outside--AND I must be nesting because I've been on an organizing spree)!

My mini maternity wardrobe is coming along GREAT.  I've finished FIVE tops & have two more I'd like to do. And for skirts, I've got four done with hopes of finishing at least two more. :) At this rate, I very well could participate in Me-Made-May. I just don't know that I could commit to taking a photo every day.

I've started a baby sleeper for baby boy. It's coming along-but it's so bizarre how it's laid out. The front & back are cut as one piece on the fold, which makes it super easy, but at times it's hard to visualize how it's going to turn out. :)

That's it for now. I promise I'll have pictures posted at some point this week. :)

Wednesday, April 11, 2012

First Baby Project


Ok, it's not sewn, but it is a project! I've been dabbling in embroidery--just working on flour sack towels & the like & decided to try my hand at a onesie.

The front says 'Baby Brother' (as you can see) and I put a couple little stars on there, too. On the back, I put our last name along the top & the number "03" in the center--like a jersey. I made the design in Photoshop Elements & printed it out. Then I traced it onto vellum using a transfer pen. Then I ironed it on & voila! SO CUTE. The transfer pen warns that it is permanent, but I found that there are only traces of it left on the back of the onesie, where the design was quite dark.

Embroidering on a knit can be a little like sewing with a knit--tricky.  I used the t-shirt stabilizer (also from Sublime Stitching--can you tell I'm a fan??) & found it to be very helpful.  There were a couple times that I had trouble, but it was a dull needle that was the problem.

I bought some little burp rags (the cloth diaper type) and I'm trying to see what I can find for solid colored onesies for some more embroidered goodness!  I'm also gearing up (hopefully!) to making quilts featuring embroidered blocks for both my oldest son & baby girl. :)  I've just got to decide on a pattern/design! :)

Monday, April 9, 2012

Finished! Ruched Maternity Top


Another finished maternity top--and I think this one was my favorite. :)  This is Megan Nielsen's Ruched Maternity Top.  I sewed a size small, and I'm very happy with the fit through the bust & belly.  I did find that the shoulders were a touch too big (though I'm finding that this is a common issue I have--in RTW and patterns). Next time I'll sew an XS through the shoulders.

I also find that the neckline is a tad wide--which is made worse by my sloping shoulders. I'm always adjusting to keep my bra straps from showing.  I would really like to frankenpattern this with the neckline of my tried & true S4076, I think the neckline gathers from that pattern would dress this up just a touch.

The tummy gathers are just right though, I like that the front is ruched but the back piece is not. The length is generous without being too much. I have no doubt that this top will last me straight to the end! 

This pattern came together just as quickly as the other, and I have to say, it's the most professional looking hem that I've ever done.  I used my old standby, the twin needle & wooly nylon on the bobbin, but I also paired it with my walking foot this round. The results are stellar, if I may say so myself. :)  Can't wait to whip up 10  more of these babies (the shirt--not 10 more actual human babies)! :)

Wednesday, April 4, 2012

Finished! Megan Nielsen Wrap Top


For the "Nuthin' but the facts, ma'am" version of this review, feel free to pop over to my official PR review. :)

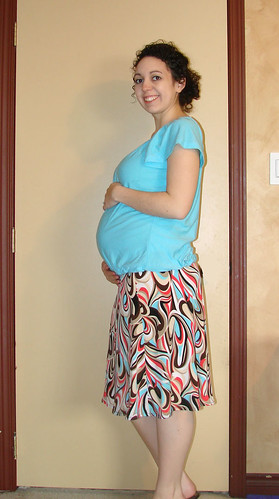
This project came together super fast, but I procrastinated on it quite a bit. I was really intimidated by cutting out the long (LONG) fabric pieces. Three yards!! Three yards of fabric for the wrap ties! They were longer than my cutting mats allowed, so I had to do some of the cutting with scissors. And I hate cutting with scissors. But it was totally worth it. :)

And then, I procrastinated a bit more because I didn't want to deal with my serger. Now, I usually don't mind re-threading the thing. It's kind of the nature of the beast. But recently I've been having a really hard time finding the correct tension...and many times I'm not even completely satisfied with it but I continue on anyway. Then it dawned on me that there are many, many sewists that construct their knit garments completely on the sewing machine. So that's what I did. And it worked great.  And I've finished two more knit tops on my sewing machine.  I even did a white top...and my serger actually already had white thread in it!!! Poor, neglected serger. 

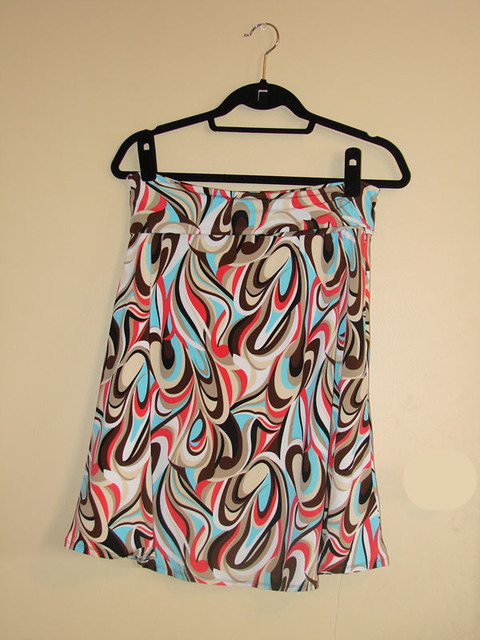
After I ordered my fabric, I started to doubt that I'd make another one of these. Why?? The yardage requirement. You need 4 yards of fabric. It cost me $33 with shipping for this brown rayon from High End Fabrics. The $33 plus the $15 cost of the pattern equals more (much more) than I would spend on a maternity top. And then, lo & behold...lookee what I found:


A bargain at $115 (the long sleeve version is $125). I don't spend that much money on...well, anything wardrobe related.  But, it is listed as one of their best sellers, and I've seen a few bloggers that have purchased this top. Either way, I love that I just made up a "designer knock off" top for 1/2 of what it would have cost to buy. So that's pretty neat.


As for the pattern itself, I cannot recommend it enough.  It comes together very quickly & is well drafted.  I did have problems with the back shoulder seam being wider than the front, but the pattern pieces themselves line up so I must've been the problem.It came together very quickly (aside from my procrastination). The only change I made was to stabilize the shoulder seams & I also sewed the sleeves in flat. 

I had decided early on that I wasn't going to hem all 3 yards of the sashes, but I did decide to hem them neckline & sleeves.  I hemmed 26" from the shoulder seams down the sashes.  Since the hemmed part of the sashes is hidden under the un-hemmed sashes, the top still looks cohesive.

Tuesday, April 3, 2012

Don't Rush the Hem!! (and a Finished project)

After the disaster that was my black linen skirt, I needed a pick me up. I was thumbing through my fabric stash & found this funky print that I had bought last summer for a maxi dress that never came to fruition (shakes fist at Fall) and look! It matches my color scheme! It matches this baby blue top, a me-made brown top (to be blogged) and a white top that is currently on my sewing table. I almost never buy RTW printed skirts because I never have tops to wear with them.

I used a knit skirt with a fold over waistband as my starting point. I tried it on & it fit ok. I added an inch to the hips & a couple inches to the hem.  It doesn't hit in the most flattering spot on my legs, but the extra length is necessary when you've got a wiggly toddler on your lap. :)

I lined it using a 40 Denier tricot that I had stashed & I'm so glad I did. The fabric is just thin enough to be right "on the line" of wearable sans slip. Now I don't have to worry at all about it being see-through & it lays so much better!

The skirt came together in a single afternoon...that is, until I got to the hem.  I decided I wanted a 1/4" hem which is a bit of a challenge even without fiddly fabric. Since the skirt is polyester, it didn't take too kindly to pressing. So, I took out my good old water soluble fabric glue (I know, how couture of me!) and slapped it together.  Of course, the hem looked awful. And the glue was dry so not only did I have to rip my stitches, but I also had to throw it in the washer to get rid of the glue. Eeep! Once that was all said & done I said "uncle" and went ahead with a regular ol' double turned 5/8" hem. :)  And it looks much better than my attempt at a narrow hem.

Monday, April 2, 2012

Megan Nielsen Maternity Patterns: A Review


This post started out as a review to the recent Megan Nielsen maternity tops that I recently finished, but I got to rambling about how much I love the patterns & Megan that it simply got too long. :)  So consider this rambling post as a prologue to my finished objects (which I will be sharing throughout the week). :) 

First, I want to give a little background on Megan. She's the genius behind DIY Maternity. Which I consider a must-stop blog for all of those who are growing a bump. It features all sorts of brilliant maternity/nursing tutorials, both from Megan herself & also from bloggers around the...internet. I think that most of these tutorials are well suited even for the most novice of sewists.

I had read rumblings that Megan had once offered a pattern or two as a free download. Obviously, we'd all prefer to get something for free than pay $15 for it. However, I was very impressed with the packaging & contents of her patterns when I received mine.  Her branding is fabulous, I love the pattern illustrations.  The instructions are in the form of a little booklet (similar to Colette patterns) and one the first page there are some nice little tips & tricks for the new-to-sewing gal. Her instructions are thorough & straightforward. My favorite part of all, though, is that at the end of the booklet she includes ways to change the pattern up a bit--adding a pocket, omitting the sleeves, things like that. She's also provided pages that you can fill with notes about the pattern for the next time you sew it up.  This is especially neat since these are exactly the type of basic patterns that can be used again & again. Also, the pattern pieces themselves are not printed on that ucky tissue paper, but on a thick paper, much like that of the Kwik Sew patterns.

In short, I love my patterns & I love DIY Maternity.  If you find yourself knocked up ;) DIY Maternity is the first site you should check out.
Related Posts Plugin for WordPress, Blogger...