Pages

Saturday, November 22, 2014

Simplicity 1254 Progress (and zipper clarification)

I was finally able to order my fashion fabric (it's a royal purple wool from mood) so the motivation to sew up my muslin has finally arrived.

There's been some talk on PR about the zipper insertion on this pattern & since I'm working through it, I thought I'd take pictures as I went along. Now, in the interest of full disclosure, I'm not done with my muslin, so at this point there's no proving that I'm doing this right :)  The instructions have you insert the right side of the zipper in step 2, while the left side of the zipper isn't put in until step 17. That's right. There are 15 steps between inserting the two sides of the zipper. Ahem.

Ok. So the pattern originally has 3 lines along the center front seam. These are the solid purple lines on my muslin (I added the blue dashed--more on that later). From left to right we have the Center Front marking, the "fold" marking, and the zipper stitching line.


The instructions read "Separate zipper. On OUTSIDE, pin zipper half with slider & pull tab face down on RIGHT front, placing teeth 1/2" from the fold line & top stop just below seam line at neck edge. Hand-baste along stitching line for zipper. Using an adjustable zipper foot, machine stitch zipper in place along basting. Remove basting. The remaining half will be applied later." (FIFTEEN steps later).

Okay then. I drew a dotted line 1/2" away from my fold line so I could see where to line up the zipper teeth. I also drew the zipper stitching line on the wrong side of my fabric (in addition to the right side). I started hand basting the zipper but that got old real quick & didn't seem to be helping much. So this is what it ended up looking like. You can see that my stitching line is right along my (crooked) basting stitches.


Now, my zipper foot placed my stitching closer to the zipper teeth than the pattern's "zipper stitching line" is. So I used my regular zipper foot & nudged my needle alllll the way to the left. If you look at the wrong side of my fabric, you can see that this put my stitching pretty darn close to where the pattern wanted it. The most "off" I got was 1/8". My stitching line (apparently I used purple in my bobbin thread--sorry) is to the left of the pattern's line.


This is what things looked like with the zipper flipped right side...right. I'm fairly certain that Simplicity could have just marked where to apply the zipper & have you stitch it regularly....but they might have been trying to keep this pattern "easy". In doing so, though, I'm afraid they may have over-complicated things.

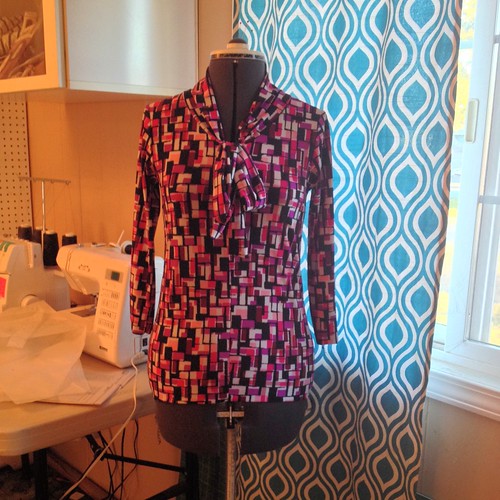
 My initial thoughts on the fit  (without sleeves or the other half of the zipper...eye roll) is that I'll need a broad back alteration and I might actually have to take the hips IN. A first for me, that's for sure. 

Wednesday, November 12, 2014

Simplicity 1254--Plan B and some WIPs

I got the dreaded call from Mood that the fabric I had picked out for my coat was sold out & it's gone for good; not re-orderable. My heart is broken. But I'm on the prowl.

I reached out to Sunni (of A Fashionable Stitch) inquiring to see if her wool crepe is would be suitable for a coat & she very kindly offered to send me swatches. There's one that I really, really like, but it's better suited for maybe a lighter jacket or suit.

I've also ordered some swatches from Mood & I received some wool swatchSd from The Rain Shed, but they're Melton weight & I'm worried that the hood won't drape nice.

All that to say that I'm at a stand-still with the coat; I haven't even started sewing my muslin because (and this sounds over dramatic) I'm inspiration-less without a fashion fabric.

In the meantime, though, I'm in the process of stitching up 2 different tops. The first is the famous scarf collar top from Jalie (which I've sewn twice before) and the other is the my recent purchase Simplicity 1280. I got it mostly stitched up, though, and tried it on and the sleeves were a really poor fit. I compared it to the armsyce of the Jalie top & figured out that the back is too narrow. So I'm considering the first version a muslin & will stitch up a final version soon.  Sorry for the iPhone pictures :)


When I was cutting out the green one I kept thinking "This fabric is too crazy." But then when I put it on I really liked it. It's definitely not something I would even try on in RTW & I'm still not sure what I was thinking when I bought the fabric, but it sure has grown on me.

Thursday, October 23, 2014

Grand Plans-Simplicity 1254


Simplicity  1254


Most of the shawl collar coats I've been seeing this season look like wool bath robes. Which is fine, if that's what floats your boat. But because of that I had kind of skimmed over all shawl collar designs. Until now. Behold! The beauty that is Simplicity 1254 by Leanne Marshall. I'd link you to Simplicity, but apparently they can't be bothered to post their own patterns to their own web page. So to PR, you go!

I still adore my Minoru jacket. In fact, I put it on the other day & my husband said "It's pretty warm out, you won't need your coat." I softly replied, "But I love her," as I tenderly stroked her sleeve...

Ahem.

My Minoru is the perfect casual coat, but I'm going to be needing a dressier wool coat this winter. I bought one 4 years ago at a thrift store and the lining is ripping out and the shoulders are too narrow for me, so it really is (past) time to move on. 

I ordered this pattern from Hancock's earlier this week (for a total of $7, the shipping cost about what it would cost to drive to my not-so-nearby store) and in a moment completely lacking of self control I ordered 3 yards of a "Heathered Purple Wool Flannel".  I was originally just looking for a nice grey, but I couldn't resist the purple in this fabric. Mood also suckered me into buying the lining when it listed it under "Related Products." Don't mind if I do, Mood. That's one stop shopping for you. Wanna see what my coat will look like? Of course you do. 


I'm slightly concerned about this project for a few reasons. One: I've never sewn with wool. Two: This is the most expensive fabric I've ever bought. Three: The pattern was just released so there's no reviews of it yet. Despite those concerns, though, I'm really very exited to get started on it!

Friday, October 10, 2014

Finished! Butterick 6031


Pattern:Butterick 6031, Gertie's slip pattern

Fabric: When Gertie did the sew-along, she offered kits in her etsy shop (which I bought)...I think this is a Micro Jersey.

Notions: Stretch lace, elastic, bow, bra strap sliders & rings

Size sewn: Size 10 with the C cup. Which was a mistake. My measurements indicate a size 12 & 14 in the waist & hips, but since the big 4 are almost always too big, I sewed a straight 10, which fit, but it was SNUG. Instead of giving up on it, I decided to go back & add 2" panels to the side seam, tapering to (more or less) nothing at the bust :) It's a design feature (wink wink). 

Alterations/Design Changes: Just the aforementioned side seam panels, heh.Oh! And I used bra strap elastic on for the back straps instead of stretch lace to achieve a little more stability.

Likes: I love this fabric! The pattern is quick to put together, runs true to size (surprise, surprise!) and is just flat out lovely.

Dislikes: None that I can think of. I was unsure about the darts, but they turned out fine.

Time to Complete: It sewed up pretty fast! with the lace & everything it seems like it would be more fiddly but I was pleasantly surprised by how easily it came together.


New Techniques: Sewing lace!

Total Cost:  The kit cost $31 & I imagine I got the pattern for about $2. I was able to find RTW slips for cheaper, but if they fit in my bust they are too small in the hips. They are also usually made out of inferior fabric without lace. Plus! This is purple! I really like that because it will offer opacity to any dress without showing through white. Something else, tricot fabric would be less expensive but still slippery. I would like to make a nude version with black lace. Rawr!

In Conclusion: Love this pattern! It got me thinking about sewing lingerie again. It was a really straight forward make & a welcome addition to my wardrobe! Gertie recently posted about altering the pattern into a bralette, which I really like.

Monday, October 6, 2014

Finished! Belcarra Blouse


When Tasia gave a sneak peak of the Belcarra with the Gabriola, I was pretty excited. But then the pattern came out & I was really unsure about the wide neckline. With my narrow & sloping shoulders it seemed like a recipe for disaster. Not to mention the fact that I'm not so good with wovens. Where most seamstresses fret over sewing knits; wovens make me nervous.  Anyway, Tasia had the Belcarra PDF on sale for awhile there so I bought it.

I've had this silk/cotton blend in my stash for a long time. I originally bought it to sew the Pendrell (the muslin proved difficult due to the fabric choice but I feared it was the pattern) and that was 3 years ago. Since then I had decided to stop using black as my "go to" so in the stash it stayed.  But, really, who DOESN'T need a versatile black top, right??

Pattern: Sewaholic Belcarra blouse

Fabric: Silk/Cotton blend from Hart's Fabric. This was a dream to work with. It pressed nicely & has a really nice sheen without being crazy shiny.

Notions: Just thread :)

Size sewn: 8 & it's a bit big (but not big enough to need to take it in). Next time I need to sew a size smaller. (Do you hear that, Jenna?! SEW A SIZE 6!) I never know what size to sew in any pattern because I'm very small boned but I'm also quite curvy.

Alterations/Design Changes: I narrowed the neckline according to the tutorial found on the Sewaholic blog
Likes:  The pintucks are so simple construction-wise, but they really pack a huge punch.  My hubby makes a habit of telling people I made stuff when they compliment me and everyone was like "You sewed these little tucks?!" LOL. I also really appreciated Tasia's little tips within the pattern when it comes to sewing on the cuffs.

Also, this PDF printed out so nice & straight. Tasia was thoughtful enough to have 1" (I think they're an inch) grid marks on the background so it was easy to make sure everything was lined up. I loved that!

Dislikes: Hmm, the pattern doesn't instruct you to stay stitch the neckline & mine stretched out despite incredibly careful handling.  It was stretched out enough that the binding was a tad too short, but not enough that I could actually gather it as a design feature, so there are some wrinkles at the neckline. I also think the neckline as drafted is too wide. But a contributing factor to that is my sloping shoulders. I'm just really glad to be able to  change it...I don't even try wide necklines on in RTW because they always fall off my shoulders!

Time to Complete: Very little! This sewed up so quickly.I could probably make it start to finish in 2 nap times if I needed to :)

New Techniques: Binding the necking. I'd never done that on a woven.

Total Cost: It's been forever since I bought the fabric, but I know it was more spendy that what I usually buy. I'm guessing it was $12-14 a yard. But I'm not counting it because it was eons ago. As in like, one whole child ago :)  And I bought the PDF when it was on sale for like $11. I think this top definitely would have cost way more if it were RTW.

Wednesday, October 1, 2014

From Wadder to Wearable-Pleated Skirt

I know. A month ago I was all "I'm back! Yay!" And I was. I've been sewing my little heart out. Honestly. I have 3 finished objects. But apparently sewing and blogging about sewing are 2 different things :) So here goes the blogging portion of the program :) I apologize in advance for the abysmal pictures.  Natural light is hard to come by in my house, and a blank wall is even more challenging to find. Also...LOOK! My in laws found a dress form for $25 at yardsale & got it for me! I still need to pad her out but she's pretty handy so far.
I got a little carried away in Photoshop. Just did away with the whole background


I had originally planned on sewing this skirt to wear at our annual convention. Two (three?) months ago. It didn't go well. The fabric I chose (a lightweight home dec) was too stiff for the pattern and it just looked huge & bulbous. So I literally wadded it up & threw it in the corner.


Fast forward to a few weeks ago, I found a pin of this tutorial & was like "Hey! She used Home Dec fabric for her pleated skirt!" So I dismantled my skirt, pressed it, hacked off a good 8-9 inches from each piece (front & back) to match the dimensions the tutorial gave, and voila! I had planned on cutting a new waistband, but the waistband from the original pattern actually fit!

I stitched the CB pleat closed so it would lay nicely
 Pattern: McCalls 6706, but not really.

Fabric:  Premier Prints Polka Dots Twill

Notions: Thread, 2 hooks & eye, zipper

Size sewn: 10

Alterations/Design Changes: I took in the side seams 8-9" to reduce the overall volume

Likes: The lapped waistband (but that was almost the only thing I kept from the design)

Dislikes: The result was too voluminous for the fabric I chose.


Time to Complete: For.Ev.Er. But not due to the pattern.

New Techniques: Blind hem by machine (which turned out great!) lapped zipper.

Total Cost:  A little under $20.

Monday, August 25, 2014

Hello again.

I've had this sewing blog for nearly 4 years now. I think it's appropriate to end my hiatus, firstly, by acknowledging that. Looking back through my archives, it's neat for me to see both how far I've come in my sewing and how much there is yet to learn.

I completely disappeared from the internet sewing community for the last few months. After my last post, I still had a pink pencil skirt to review but decided I hated it. That began what was a long slew of self stitched wadders & UFOs. I did manage to make the kids' outfits for our annual convention & I will post those pictures (if nothing else it is fun to see how much they've grown the last few years).

Not only did I stop blogging, I stopped reading sewing blogs, reviews, message boards. I allowed all sewing inspiration to stop. My failures hit me hard. They made me question what I was doing sewing if it was all just a waste of time and money.  I mostly sew because it feels good. Being able to have something useful that you made; that's cool. Being a homeschooling stay at home mama, my days are full but all too often, at the end of the day, I find myself with many items on my to do list left un-done.  And to spend hours working on a sewing project only to have it fail, and fail hard. It hurt. And it was project after project. I did try to get back on the horse, but man! It just wasn't happening.

The mistakes were always different. Couldn't get the fit right. Bought the wrong fabric. Got sloppy during the cutting stage. Rushed zipper insertion. Took a short cut & didn't line the skirt.  Pre-shrunk fabric shrunk significantly after being sewn. A sewist's heart can only take so much.

But then my sister wore the dress I made her 3 years ago to her baby shower. And being the good little sister she is, she made sure to tell everyone who complimented her that I sewed the dress. That I had made the majority of her maternity wardrobe (that I had sewn for myself 2 years ago when I was pregnant with my third).

And gosh darn it. I CAN sew. I'm good at it (mostly). I love it. This hiatus, though, has taught me a few things. I've learned the importance of cleansing my palate with TNTs. Of focusing on the positive; the things I have successfully sewn. Something is better than nothing. Perfect is the enemy of the good. Stewing a basic t-shirt is better than stewing over the custom dyed lace dress that never got past the muslin stage (sob!)

So. I'm back, I think. My first project will be a color blocked tunic. Vogue 8950. It's rated Very Easy. It's a knit, which, well is the very epitome of my comfort zone and it requires just a smidge over one yard of fabric. Hopefully all goes well.

If that goes well, then I've got big plans. I've had my eye on the Robson pattern every since I made the Minoru and this is what I envision.

Thursday, February 20, 2014

Simplicity 1467


I don't typically get really excited about newly released patterns.  I usually end up sewing patterns looooong after they've gained popularity. Some of my favorite patterns were voted "Best Pattern of the Year" in 2010-12. In fact, I think this is the first time I'm the first reviewer of a pattern over on PR.


But Simplicity 1467 was an exception. I loved it from the first minute I saw it. I love wardrobe patterns, in theory. But they always seem to be missing on component or another. I really liked all of the components this one had to offer. I bought it as soon as Simplicity patterns went on sale at Joann Fabrics & ordered fabric for it right away.

Pattern: Simplicity 1467-the blouse, view A
Notions: Fabric, thread, interfacing & two buttons
Fabric: Cotton voile from fabricmartfabrics.com. It was on sale for $3 a yard.
Size sewn: 8 in the bust (though I used a 1/4" seam allowance) and graded out to a 14 at the hips. It is a smidge too tight in the bust. I'll probably grade up next time. I also took the back seam in an inch at the small of my back.
Alterations/Design Changes: None other than the sizing alterations described above.
Likes: I love that it's sleeveless, but has plenty of coverage. I like where the neckline hits, I like the yoke. It looks great paired with pants & skirts.I love the little buttons on the back, too.
Back
Dislikes: None. I had my doubts about the facing, because I tend to hate them. But this was the first time that I'd seen the armholes & neckline both finished with a single facing piece. It worked out very well & doesn't seem to have the problems that I usually find with typical facings.
Time to Complete: Not long at all. I started this top while I was waiting for zippers to arrive. I had it muslined & everything within 3 days.

New Techniques: Just the fact that I used a woven fabric & everything that entails. :)
Total Cost: Pattern: $.99; fabric $5.  So, a $6 top!! Gotta love that!!

Wednesday, February 12, 2014

Spring SWAP

Rumor has it that Spring is on its way. I live in the Pacific Northwest, and don't anticipate "Spring" weather until May or so, but nevertheless I decided to come up with a plan for my next few projects.  I've found that creating "capsules" really focuses my sewing energies.

Again, I'm focusing on dressier pieces. Jeans & a t-shirt are my day to day at home wear, and though I do have hopes of branching out, I'm just not quite there yet.

I already have all the fabrics & patterns for these pieces. The pink skirt is in progress (along with a non-SWAP tweed skirt) and the geometric print top will be finished today. I love how it turned out.  The jacket is my 'branching out' pattern. It's a woven, and will definitely need muslining (and likely alterations) prior to the actual construction. It also calls for shoulder pads, which is something I've never done.

I ordered a Brother 1034D serger yesterday & it should be arriving next week; I hope to whip out Vogue 1314 as it's maiden project. 


Tuesday, January 28, 2014

A New TNT!

I finally got around to photographing my new top. Dh was home from work for a week & a half on vacation & I just didn't get it done.  But here it is. I do wish I could've taken better pictures, but these'll do. :) Also, I had my husband cut my hair, so, yes, it is different :) in case you were wondering. :)

Pattern: New Look 6735
Fabric: Cotton/Lycra knit from Girl Charlee
Notions: Thread & seam stabalizer for the shoulders. Wooly Nylon in the bobbin for the hems. 
Size sewn: 12 in the shoulders, bust & waist, grading out to a 14 at the hips. I ended up using a 1/4" SA on the side seams instead of the 5/8" as the pattern suggested. Just wanted  a tad more wiggle room. 
Alterations/Design Changes: This is the exciting part! I added gathers to the neckline & sleeve caps to take this from a "t" to a top. I blogged those alterations here.Also, since I messed with the neckline, I drafted one myself using this tutorial.  It worked out well! I also did a double fold hem instead of the single fold that the pattern suggested.


Likes: Everything? It's a super fast sew and I was able to squeak this out of 1 yard of fabric. I really wish I would have made 2 or 3 at once, but I wanted to make sure it worked out first. Next time! I love that it can be dressed up or down.
Dislikes: None. I thought I'd dislike the center back seam, since I don't think I've ever seen it in RTW,  but it really does provide some nice shaping.


Time to Complete: Not too long, but I took my sweet time with it. It could probably be finished in just a couple hours.
New Techniques: Pattern drafting :)
Total Cost: $6 for the fabric, everything else was from my stash! SIX DOLLARS!

Thursday, January 9, 2014

In progress...


I was all excited to reunite with my TNT S4076 for my next project. Those little cap sleeves, that little gathered neckline...swoon. But when I got out my tracings I realized that I did not have my original tracings OR original pattern tissue. All I had was the pattern I made for my maternity version. And the pattern is OOP; I've found a few copies of it on the web, but none in the smaller size range.

After some pouting and a whole lot of rummaging, I decided to just take advantage of this conundrum. I've been wanting to delve a bit into drafting & making design changes to TNTs.  So this was a great opportunity. I started out with the very popular t-shirt view New Look 6735 and set out to add the neckline gathers. I asked the opinions of more qualified seamstresses, and I also found this video.

First I traced the pattern in my size (or what I hoped would be my size). Then I traced the bottom portion onto freezer paper and then I pivoted my pattern piece beneath the armscye.I moved it about an inch at the CF, and truth be told I was really worried about the changed neckline shape, but figured that (in theory) that gathering would pull it back to its shape...more or less.


Here's how my new pattern piece compared:

And then I got to thinking about other ways to dress up a basic tee. I eventually decided to gather the sleeve caps. I used the instructions for the at clothingpatterns101.com. First I traced my pattern on to freezer paper and removed the seam allowances, just to ensure that I didn't mess those up. :) I never really realized how much space those 5/8" seam allowances take up.


And then I sliced & spread. I probably have sliced the same distance from the center dot on each side,  but it turned out ok in this instance.


After that I traced my new pattern & added the seam allowances back.


I only had 1 yard of fabric for my final top, so I made a practice sleeve & armscye from some scraps  to check my drafting and it turned out great.

I should have pictures of the final project next week, it's just waiting to be hemmed now. 


Related Posts Plugin for WordPress, Blogger...