Pages

Friday, June 15, 2012

My Bucket List: Sewing Style

The countdown is well underway! Our little guy should be arriving in 50 (yes, 50!) days give or take. A month and a half. Just over 7 weeks. And I have some sewing to do! I thought I'd do a blog post of my to-do list--more for me than for my readers :) but I thought it'd be fun to share.
Photos linked to sources below :) 

1. Chase Pants-Dress pants for my little guy to wear to the Convention in the middle of August. I have the pattern & the fabric.
2. Matching vest
3. Tie to coordinate with....
4. Eden Dress- The skirt portion will be made from the same fabric as DS's suit (khaki twill) and the blouse will match his tie. Shawn picked a really pretty navy blue satin for this.
5. Coming Home Outfit- Kwik Sew 2246 (muslin here) Fabric swatch has been ordered--I need to find a coordinating ribbing and zipper. 
6. Big Brother, Big Sister applique shirts. I'll probably just purchase plain t-shirts & then hopefully applique the words on them. This is "low" priority, but I do hope to get it done.
7. Diaper bag! I bought the pattern from Watermelon Wishes on Etsy. The outer fabric will be a grey twill and the lining will be a combination of Verona Teal & Dots quilting cotton. 
8. Nursing Cover- Easy nursing shawl using tutorial from The Coterie Blog. I'm so glad I found this, I have a couple different traditional nursing "aprons" and I hate them.

Well, that's quite a list!! Add in a couple more tops & maybe even a maxi dress for myself & I'll be a busy girl!! I don't feel "pressure" to get any of it done except for the first 4 for the Convention (and I should be able to finish all 4 in a week or so), and the coming home outfit (which will take a couple days, probably).  The rest would just be icing on the cake!

Thursday, June 7, 2012

Finished: For Baby


I can't help but say "Awww..." every time I see this little sleeper.  It's actually a muslin, before I set out to make my final version for the coming home outfit for my little guy.  I had very a very specific design in mind when I set out to find a pattern.  I wanted it to have a zipper. And it was a bit of a challenge to find one.

I found KS 2246 on Etsy for $3 & snatched it up! The front & back of the pattern are one piece, cut on the fold. It was the most bizarre pattern piece I had ever seen, and I really struggled to figure out what would go where. I did have to rip a couple seams along the way but all in all it turned out pretty cute!

I got the fabric from Joann's clearance section--it's really thin, but it served its purpose. For the final version, I'll use this fabric from Spoonflower.  

Neckline Ribbing with gap :(
The ribbing at the top of the zipper had me stumped, but I was making it more complicated than it should be :) Next time I sew it, though, I'll move the zipper up a 1/4" to avoid the little gap at the top (if I'm smart & read this blog post before I sew it again, that is--I should make a note on the pattern instructions to be sure...). 

This is size Small (0-3) but as I suspect, it's a bit big. The back of the pattern says it'll fit 24 inches long & 13 lbs.  And it looks comparable to the 3-6 month RTW sleepers I have.  Needless to say, my newborn will be swimming in it...but I'd rather it be too big than too small. Shawn's coming home outfit was too small & it almost broke my heart. :)


Wednesday, May 30, 2012

Embroidery FO & WIP

I've been working on a few embroidery projects lately.  I've loved this tote design since the first time I saw it at Sublime Stitching.

My dad used to call me "Medusa" when I was growing up (on account of my untameable curly hair) and for some reason this design reminded me of that...Medusa...but pretty.  Now that I think about it, it is a bit symbolic, I guess. Growing up I hated my curly hair; I would have done anything to have hair like the "other girls". But now, I realize that it's very much a part of who I am.  In fact, I think many of my friends would say it's my best physical asset.  It's still a bit unruly, but I've accepted it, and even come to love it. Anyway, apparently, this design really spoke to me, and I'm really enjoying stitching it. The design is perfect for showcasing a variety of stitches & colors. 


And a few more baby projects.  Simple cloth diaper burp cloths.  These stitch up really quick (the truck isn't done yet) & that little dinosaur has stolen my heart. I want to stitch him on everything.  The car & truck designs are from the Sublime Stitching book I got awhile back; the dinosaur is a clip art image I found online.


Wednesday, May 23, 2012

From Seamstress in Training to Sophisticated Seams

I know I've been MIA lately--and I have been sewing! Just not for me :)  Awhile back I mentioned that I had started sewing for some of the gals on a forum I'm on.  And shortly after that, I revamped the blog from Seamstress in Training to Sophisticated Seams. I thought I'd share what's been going on behind the scenes. :)  This is going to get long...and include a lot of pictures. :)

Back in August, a friend approached me to design and sew a custom bag for her--using changing pads from her favorite diaper bags. As you can imagine, there was a lot of planning.  And since we were using changing pads, all the pattern pieces had to be just the right size.  So I made a prototype & sent it to her.

It was just what she was hoping for, so we moved on to the actual purse.  Here's the final product that I finished in December.


So, fast forward to recently & I had a request to make the same bag using different changing pads.  I received the materials at the beginning of the month & I have finally completed another bag.  This one has additional slip pockets on the back. 

(The fabric used for these bags are from Ju-Ju-Be diaper bag changing pads. Both prints, Purple Paisley & Blue Bouquet are now discontinued.)


So that's why the blog switched over to "Sophisticated Seams".  Though now that I'm back to focusing on sewing for me and not as a business I'm having a bit of an identity crisis.

29 Weeks & counting
So with this bag, I'm officially on maternity leave!! Next up: a diaper bag (for myself!), a coming home outfit & a maxi skirt...or five.

Tuesday, May 8, 2012

Simplity 4037+Megan Nielsen's Ruched Top= Perfection!

When I blogged about my Ruched maternity top, I had mentioned that I'd really like to adapt it to have the gathered neckline of my non-maternity TNT S4037.  I had also noticed that the shoulders of the Ruched top aren't quite "fitted" (the back was much too big--the pattern piece for the sleeve was symmetrical) so I figured while I was at it I would just go ahead & use the neckline, shoulders & sleeves from S4037. Easy enough, right??

Eh. I first traced the S4037 pattern pieces & kind of merged them with the Ruched top pattern pieces. Then I decided to read my review on S4037 before I went ahead & cut out my fabric. And it's a good thing I did. Originally I had sewn up a size 10, but this time I traced an 8 in the shoulders.

So then I had to trace it again. With the right size this time.  I thought it would be pretty straight forward--neck, shoulder & armholes from S4037 & then from the bust on down would be my Ruched top.  But I couldn't figure out where the patterns should match up. The shoulders?? They weren't even similar--which was so bizarre because I totally thought "honestly--how different can shoulders be??" Very.  Same for the necklines, and armholes.  All very different; which makes sense because, well, what would be the point of merging 2 different patterns if they were "very similar"??

Anyway, I just kept tracing.  And when I'm done, I look at my "back" piece & it was really short! It was then that I determined a muslin was no longer optional.  I hastily hacked out the front & back piece, ruched the front piece, attempted to sew them together and that's when it became clear that something went terribly wrong. The front piece was fine, but as I suspected, the back piece was crazy short. So I went back to tracing, but this time I started at the bottom of the Ruched piece & merged it into S4037. And this is what I ended up with:

It is by far my favorite top! I've been wearing it a ton & I think the next one I make I will go ahead & lengthen the back just a bit; maybe an inch, just to ensure extra coverage. I hate it when my top rides up & you can see the maternity panel on my pants.

Also, this is my new favorite fabric. It is Robert Kaufman's Laguna stretch knit & it is absolutely perfect. Thick enough to not need to wear a cami underneath (so many knits are see-through!) but it has 4 way stretch. It comes in a ton of colors and I have 6 more yards on the way to me now (turquoise, hot pink & black...part of it will become a maxi skirt or two)

And also (wow! This is getting long) I refashioned this skirt from a pair of jeans :) I rushed the hem (when will I ever learn?!) but it's still wearable.  I'll take more care next time. :)

Wednesday, May 2, 2012

McCalls 6034: Maternity Style

26 Weeks along
Here's another  version of McCalls 6034.  The shoulders on my last version were a bit too big, so after much deliberation, I cut these ones a size smaller, XS. After all, my shoulders haven't gotten any bigger this pregnancy.  I cut the rest of the pattern out as a S and add 4 inches in length, to accommodate my tummy. Once again, I ruched the side seams to get a gathered look. And again, I omitted the bottom band; to be honest I forgot the pattern even has one.

The pattern itself came together without a hitch. Even the narrow hems that I had trouble with last time were easily tamed. I suspect this is due to the fabric being cotton rather than polyester. The fabric is nice, but since it doesn't have the same drape as my polyester version (of course). I sewed all the hems with a twin needle complete with wooly nylon in the bobbin, so they're nice & stretchy.

Had I realized that the RTW contest was going to start on April 1, I would have waited to cut the top out and entered this top in the contest.  Oh well. I had started it a bit early & it's been done for a few weeks now (bad blogger!!!)


Just for fun--proof that sewing CAN save money (I have a more in depth post on saving money on maternity sewing coming up soon). Motherhood sells a very similar top for the killer price of $26.98.  My pattern took just shy of 2 yards--and I bought this cotton knit on sale for $5 a yard at Sawyer Brook. Since I've already sewn the pattern up once (and bought it during a 99 cent sale) I didn't include that in the cost. So that's what, a savings of almost 60%?? Gotta love that!


Monday, April 23, 2012

Just a quick post...


I've been so busy sewing I haven't had time to blog (and the weather has been so nice we've spent a lot of time outside--AND I must be nesting because I've been on an organizing spree)!

My mini maternity wardrobe is coming along GREAT.  I've finished FIVE tops & have two more I'd like to do. And for skirts, I've got four done with hopes of finishing at least two more. :) At this rate, I very well could participate in Me-Made-May. I just don't know that I could commit to taking a photo every day.

I've started a baby sleeper for baby boy. It's coming along-but it's so bizarre how it's laid out. The front & back are cut as one piece on the fold, which makes it super easy, but at times it's hard to visualize how it's going to turn out. :)

That's it for now. I promise I'll have pictures posted at some point this week. :)

Wednesday, April 11, 2012

First Baby Project


Ok, it's not sewn, but it is a project! I've been dabbling in embroidery--just working on flour sack towels & the like & decided to try my hand at a onesie.

The front says 'Baby Brother' (as you can see) and I put a couple little stars on there, too. On the back, I put our last name along the top & the number "03" in the center--like a jersey. I made the design in Photoshop Elements & printed it out. Then I traced it onto vellum using a transfer pen. Then I ironed it on & voila! SO CUTE. The transfer pen warns that it is permanent, but I found that there are only traces of it left on the back of the onesie, where the design was quite dark.

Embroidering on a knit can be a little like sewing with a knit--tricky.  I used the t-shirt stabilizer (also from Sublime Stitching--can you tell I'm a fan??) & found it to be very helpful.  There were a couple times that I had trouble, but it was a dull needle that was the problem.

I bought some little burp rags (the cloth diaper type) and I'm trying to see what I can find for solid colored onesies for some more embroidered goodness!  I'm also gearing up (hopefully!) to making quilts featuring embroidered blocks for both my oldest son & baby girl. :)  I've just got to decide on a pattern/design! :)

Monday, April 9, 2012

Finished! Ruched Maternity Top


Another finished maternity top--and I think this one was my favorite. :)  This is Megan Nielsen's Ruched Maternity Top.  I sewed a size small, and I'm very happy with the fit through the bust & belly.  I did find that the shoulders were a touch too big (though I'm finding that this is a common issue I have--in RTW and patterns). Next time I'll sew an XS through the shoulders.

I also find that the neckline is a tad wide--which is made worse by my sloping shoulders. I'm always adjusting to keep my bra straps from showing.  I would really like to frankenpattern this with the neckline of my tried & true S4076, I think the neckline gathers from that pattern would dress this up just a touch.

The tummy gathers are just right though, I like that the front is ruched but the back piece is not. The length is generous without being too much. I have no doubt that this top will last me straight to the end! 

This pattern came together just as quickly as the other, and I have to say, it's the most professional looking hem that I've ever done.  I used my old standby, the twin needle & wooly nylon on the bobbin, but I also paired it with my walking foot this round. The results are stellar, if I may say so myself. :)  Can't wait to whip up 10  more of these babies (the shirt--not 10 more actual human babies)! :)

Wednesday, April 4, 2012

Finished! Megan Nielsen Wrap Top


For the "Nuthin' but the facts, ma'am" version of this review, feel free to pop over to my official PR review. :)

This project came together super fast, but I procrastinated on it quite a bit. I was really intimidated by cutting out the long (LONG) fabric pieces. Three yards!! Three yards of fabric for the wrap ties! They were longer than my cutting mats allowed, so I had to do some of the cutting with scissors. And I hate cutting with scissors. But it was totally worth it. :)

And then, I procrastinated a bit more because I didn't want to deal with my serger. Now, I usually don't mind re-threading the thing. It's kind of the nature of the beast. But recently I've been having a really hard time finding the correct tension...and many times I'm not even completely satisfied with it but I continue on anyway. Then it dawned on me that there are many, many sewists that construct their knit garments completely on the sewing machine. So that's what I did. And it worked great.  And I've finished two more knit tops on my sewing machine.  I even did a white top...and my serger actually already had white thread in it!!! Poor, neglected serger. 

After I ordered my fabric, I started to doubt that I'd make another one of these. Why?? The yardage requirement. You need 4 yards of fabric. It cost me $33 with shipping for this brown rayon from High End Fabrics. The $33 plus the $15 cost of the pattern equals more (much more) than I would spend on a maternity top. And then, lo & behold...lookee what I found:


A bargain at $115 (the long sleeve version is $125). I don't spend that much money on...well, anything wardrobe related.  But, it is listed as one of their best sellers, and I've seen a few bloggers that have purchased this top. Either way, I love that I just made up a "designer knock off" top for 1/2 of what it would have cost to buy. So that's pretty neat.


As for the pattern itself, I cannot recommend it enough.  It comes together very quickly & is well drafted.  I did have problems with the back shoulder seam being wider than the front, but the pattern pieces themselves line up so I must've been the problem.It came together very quickly (aside from my procrastination). The only change I made was to stabilize the shoulder seams & I also sewed the sleeves in flat. 

I had decided early on that I wasn't going to hem all 3 yards of the sashes, but I did decide to hem them neckline & sleeves.  I hemmed 26" from the shoulder seams down the sashes.  Since the hemmed part of the sashes is hidden under the un-hemmed sashes, the top still looks cohesive.

Tuesday, April 3, 2012

Don't Rush the Hem!! (and a Finished project)

After the disaster that was my black linen skirt, I needed a pick me up. I was thumbing through my fabric stash & found this funky print that I had bought last summer for a maxi dress that never came to fruition (shakes fist at Fall) and look! It matches my color scheme! It matches this baby blue top, a me-made brown top (to be blogged) and a white top that is currently on my sewing table. I almost never buy RTW printed skirts because I never have tops to wear with them.

I used a knit skirt with a fold over waistband as my starting point. I tried it on & it fit ok. I added an inch to the hips & a couple inches to the hem.  It doesn't hit in the most flattering spot on my legs, but the extra length is necessary when you've got a wiggly toddler on your lap. :)

I lined it using a 40 Denier tricot that I had stashed & I'm so glad I did. The fabric is just thin enough to be right "on the line" of wearable sans slip. Now I don't have to worry at all about it being see-through & it lays so much better!

The skirt came together in a single afternoon...that is, until I got to the hem.  I decided I wanted a 1/4" hem which is a bit of a challenge even without fiddly fabric. Since the skirt is polyester, it didn't take too kindly to pressing. So, I took out my good old water soluble fabric glue (I know, how couture of me!) and slapped it together.  Of course, the hem looked awful. And the glue was dry so not only did I have to rip my stitches, but I also had to throw it in the washer to get rid of the glue. Eeep! Once that was all said & done I said "uncle" and went ahead with a regular ol' double turned 5/8" hem. :)  And it looks much better than my attempt at a narrow hem.

Monday, April 2, 2012

Megan Nielsen Maternity Patterns: A Review


This post started out as a review to the recent Megan Nielsen maternity tops that I recently finished, but I got to rambling about how much I love the patterns & Megan that it simply got too long. :)  So consider this rambling post as a prologue to my finished objects (which I will be sharing throughout the week). :) 

First, I want to give a little background on Megan. She's the genius behind DIY Maternity. Which I consider a must-stop blog for all of those who are growing a bump. It features all sorts of brilliant maternity/nursing tutorials, both from Megan herself & also from bloggers around the...internet. I think that most of these tutorials are well suited even for the most novice of sewists.

I had read rumblings that Megan had once offered a pattern or two as a free download. Obviously, we'd all prefer to get something for free than pay $15 for it. However, I was very impressed with the packaging & contents of her patterns when I received mine.  Her branding is fabulous, I love the pattern illustrations.  The instructions are in the form of a little booklet (similar to Colette patterns) and one the first page there are some nice little tips & tricks for the new-to-sewing gal. Her instructions are thorough & straightforward. My favorite part of all, though, is that at the end of the booklet she includes ways to change the pattern up a bit--adding a pocket, omitting the sleeves, things like that. She's also provided pages that you can fill with notes about the pattern for the next time you sew it up.  This is especially neat since these are exactly the type of basic patterns that can be used again & again. Also, the pattern pieces themselves are not printed on that ucky tissue paper, but on a thick paper, much like that of the Kwik Sew patterns.

In short, I love my patterns & I love DIY Maternity.  If you find yourself knocked up ;) DIY Maternity is the first site you should check out.

Thursday, March 29, 2012

It's a....

I know what you're thinking, "I thought they weren't going to find out the sex." Correct. We were not. But we had our ultrasound & our technician neglected to ask us if we were going to find out, and well also, our little boy is anything but shy (he's also healthy as far as we can tell...which, as we all know, is the REALLY important part). :)  

I'm so excited to know the sex & I'm thrilled to be adding another little guy to our family.  I don't know if I've mentioned it, but I'm planning on making  baby's coming home outfit. Originally, I was going to make one for a boy & one for a girl. Which, now is unnecessary. I bought OOP Kwik Sew 2246 for just the occasion. So now we're on to fabric.  I'm loving stripes, but they are so easily found in RTW that it seems silly to go that route. I've been perusing Spoonflower instead & I've found some lovelies.  This one, so far, is my favorite (click the image to go to the source).  


And I also love this one....

And I'm only getting started in my perusing. :) The knit fabric from Spoonflower is nearly $30/yard (GULP!) so I really need to be sure about my choice. 

Next week I should have at least 3 maternity wardrobe pieces to share, too, so stay tuned. :)

Thursday, March 22, 2012

Making Progress

Source
I don't have any pictures yet, but I've successfully drafted & finished one knit skirt from a fabric in my stash that wasn't listed in the original plan. It is a funky print that includes red, white, blue & brown, which means all but my planned yellow top will match it.  

I've also muslined a woven skirt with a fold over elastic waistband. It went well other than the fact that I applied the FOE to the hem of the skirt instead of the waist the first time around. That made me giggle. Which is good, these days it could just have easily made me cry.

Aaaand I have 2 maternity top patterns all cut up & ready to sew. New wardrobe here I come. Now if only it would stop snowing so I could wear it!

Thursday, March 15, 2012

Maternity SWAP: Skirt 1: Fail.


I stumbled upon this tutorial on Pinterest & thought it would be perfect for my black linen skirt. It should have turned out like the above skirt. Did it?


Negative. It did not.  In fact, I removed...prepare yourself...THIRTY inches from the side seams. Thirty inches PLUS tapering it in at the bottom. I mean, I realize that I'm a "pear" and that I gain weight in my hips/thighs...but I am no where as big as this skirt would have you believe.

 To top it off, I expected it to be an "afternoon project". It's turned into more like a 5 afternoon project (2 of those afternoons were wasted when my serger LITERALLY fell apart...more on that later) And I just can't figure out where it went so wrong. For a moment, I thought, "Maybe my fabric is too heavy" but it's just linen. It was light enough to require a lining (from Bemberg Rayon....what a pain!)

I keep going back & fourth as to whether to just declare this one a wadder & move on. But GOSH. What a waste of fabric that would be. Not to mention time. I'm starting to feel like this skirt must be conquered. At all costs.

 I was kind of depending on this "pattern" to be a jumping off point for future skirts. Sigh. At least now I know what won't work, right?? Back to the drawing board, I guess.

Also, I ordered (& received) my other skirt fabric...only to discover I only ordered 1 yard of each. Sheesh!! I don't know WHAT I was thinking. Guess I'll order another yard & have some nice sized scraps.

Monday, March 12, 2012

Finished! Vogue 8581


Well, Vogue 8581came together somewhat quickly.  It really is a very straightforward design, and it lends itself quite nicely to "maternity", but I didn't like the gathering & I was a little surprised to find that it recommended 3/4" elastic at the waist.

It's been finished for over a week & I've worn it a number of times, so that's a good sign.  I do find myself adjusting the waist gathers a lot, but I think that  can mostly be attributed to the fact that I used 1/4" elastic in a 3/4" tunnel.  I just couldn't bring myself to rip it out & re-do it.

I totally blew the neck gathering, too.  I spent all this time meticulously gathering only to find that I didn't gather it enough for the neckband to be properly stretched, thus causing a won't-lie-flat neckband. So, I ripped it out & used an elastic casing instead. Next time I'll do that the first time around. :)  

I also decided to leave the sleeves as flutter sleeves, because I like them :) and also because it was faster.  However, I think that they could stand to be a tad longer.

All in all I though this was a good pattern. I'm happy with how it turned out. I should be able to churn the next one out in an afternoon (famous last words, right??) You can see my official review with less ramblings on Pattern Review.

And here's the obligatory "belly shot" It was hard getting a good silhouette with all that extra fabric. :) And since we're on the subject, I'm 19 weeks along now. The morning sickness is long gone & I'm feeling great.  So great, in fact, that I'm behind on my sewing but ahead on housework. :) Oh well, you can't do it all.

Wednesday, February 29, 2012

SWAP: The Maternity Edition

I'll admit; sewing with a plan isn't something I'm good at sticking to. There's always another project that gets thrown in the rotation, but this time I've even shopped my stash. I've tried to find a color scheme that will mix & match nicely. And by golly, I think I've got it.

Swatches 1-6 are for skirts. I'm going to try to see if quilting cottons will work. Two of the six fabrics are already in my stash. :) I'm not completely sold on #4...we'll see. Number 2 is my favorite as it matches virtually all the tops I have in mind. :)
3. Stashed floral linen
5. Lightweight stretch twill
6. Stashed solid black linen

Swatches 7-11 are solid knits for tops.  I already have 8,10, & 11 in my stash. In fact, the light blue is already sewn up (but not photographed/blogged/reviewed)! 

So that's the plan. The skirts should all be fast projects. Like an afternoon each. What I really need to get sewing is the tops. :)

Tuesday, February 14, 2012

Instant Gratification project

That's right, ladies (and any gents who may have stumbled upon this blog), I have a FINISHED project to share! And...wait for it...it only took me ONE nap time to complete!! And that's INCLUDING taking a break to make brownies with my little guy (not from scratch...from a box, obviously...I had a dress to sew!)

After searching high & low for a dress pattern/tutorial with long sleeves to no avail (actually Ottobre has them, but I have yet to decide on just one issue to order), I finally found this tutorial from Prudent Baby (ah--I love them!)

The tutorial included the sizing for 2T & I hemmed & hawed over what measurements to use for my Little, I did measure some of her current dresses but in the end decided to just go with their recommended dimensions.  (I had started this dress before, in flannel, but had decided to use my own measurements. It was AFTER cutting out the sleeves that I realized that they were Raglan, not set in like I measured. Yeah. I probably could have salvaged it, but I just threw my hands up & walked away)

I'm pretty happy with how it turned out. I don't like the way it balloons out at the bottom, I should have went with my instinct & took some of the width out, but other than that it is pretty cute.

I bought the corduroy from Joanne Fabrics, despite my hesitation. the last time I bought corduroy from them it was so off grain that it was un-useable. Ridiculous. But this particular corduroy seems to be good quality & it made me wish I had bought a bit more yardage.

So there we have it. Next up on my to do list is to trace a couple of patterns for knit tops for maternity. I'm also compiling a list of fabrics to order once payday hits ;)

Tuesday, January 31, 2012

Maternity Sewing Plan

So, my "maternity sewing plan". (Subject to change, as usual, of course). Since I didn't start sewing until late in my pregnancy with my daughter, this is an exciting endeavor for me. And, surprise, surprise there seems to be more & more "maternity sewing" tutorials & patterns cropping up every day (thank you, Pinterest!)

So, here's what I'll need.

Stick with knit tops. Wovens hang funny & ALWAYS include a bow or sash of some kind. For my first pregnancy, I kind of liked the bows. But now, well...I am NOT a present. Also, knit tops tend to flatter all the way through pregnancy. So, here's my plan.
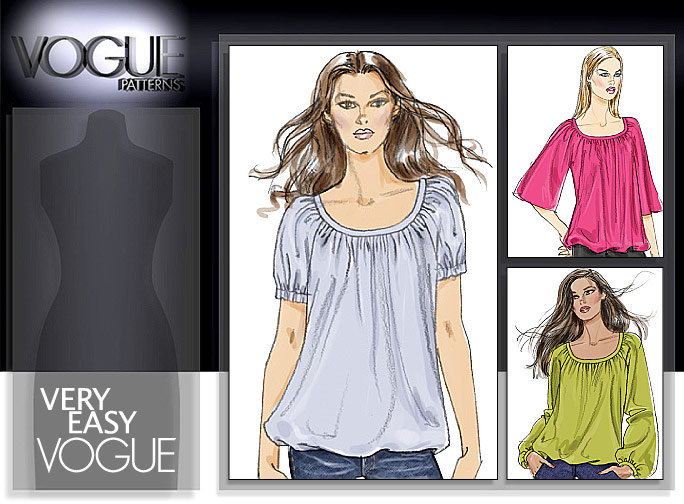
Vogue 8581
Already in my stash, rated "very easy" and has a number of positive reviews!! Bonus--my FAVORITE maternity top from my last pregnancy was very, very similar in design. There's a good chance I won't need to do any maternity alterations on this one.

Wrapped Maternity Top by Megan Nielson


Images courtesy of Megan Nielsen


I swear, the first time I saw this pattern my heart went pitter-patter. I LOVE the design! It is by Megan Nielson, an independant designer who ALSO designs & sells non-maternity wear. Her blog diymaternity.com has INVALUABLE tutorials & tips. You MUST check it out if you ever find yourself needing some maternity sewing inspiration.

The only downside to this design is the fact that it requires 4 yards (FOUR) of fabric. But no matter. I love it anyway. Also, the pattern is $15 which is expensive when you're used to buying the Big 4 for .99, but honestly I'm MORE than happy to support her business :)

Ruched Maternity Tshirt by Megan Nielsen


Also by Miss Megan, the Ruched top. With a variety of sleeve length options. This design can be a staple in any wardrobe--with or without baby bump :) Megan offers a slew of other maternity patterns, but for now I'm sticking with just these 2 with the option of going back for more, of course. :)

As for pants-well, I'm hoping to thrift any new jeans that I'll need & I have plenty of comfy pants that never see beyond the 4 walls of our home :) I also have a few pairs of adorable shorts for this summer. Which brings me to...
Source

Skirts. Ah, maternity skirts. They are SO HARD to find RTW. Can you believe that?? Also, a frightening new trend is MINI maternity skirts. Like, MID THIGH. Uhm....no. Honestly, how does one chase after not one, but TWO toddlers WITH giant belly in a mini skirt...better yet...who would want to?!?

So, no. No thank you to mini maternity skirts. Also, just barely skimming the knee is not quite long enough. Again, thanks to Pinterest, I have a variety of other options. There's a ton of tutorials on adding knit belly panels to existing skirts & also, I'm pretty comfortable drafting my own basic skirt. Typically, I prefer everything to "under the belly" so that should make it a bit easier. Again, I'll likely be sticking to knit fabrics for their ease of wear & stretchability...which means no zippers necessary! :)

So, in short, I'll be sticking to 4-5 basic patterns in various solid colored fabrics. Maybe in a future post, I'll go over some of my favorite places to find knit fabrics.

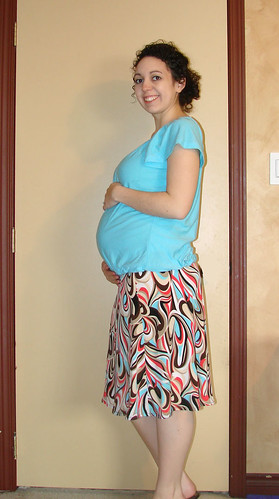
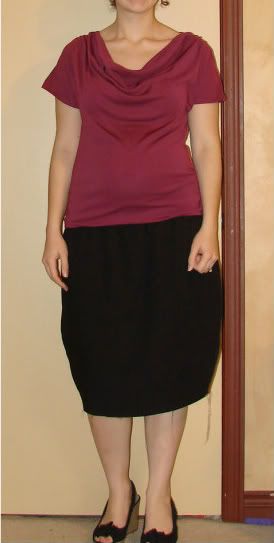
Just for fun, I'll leave you with my most loyal maternity top. It lasted me through 2 pregnancies & is still going strong. I have yet to put it on, but it will be great for when I'm...huge.


The first was taken on my due date with my son...he didn't arrive for another FOUR days (and I happened to wear this top on the way to the hospital) and the second was about 6 weeks before my due date with Laila.

Monday, January 30, 2012

Different Kinds of Sewing

Source

Baby number 3 is on it's way! He (or she--and we won't find out until delivery!) will be making his/her appearance in early August!

So, you know what that means. Maternity & baby sewing!! I have a couple maternity patterns all picked out & I'm excited to share. I'm also planning on making the baby's coming home outfit. More on that soon!
Related Posts Plugin for WordPress, Blogger...