I was originally going to sew a cowl neck Renfrew for my 6 PAC, but Jalie 2921 kept calling to me. I had 3 yards set aside for this project, so I had lots left over to sew a little dress for Laila. I hope to take some better detailed pics soon, but I wanted to get this post up before 2014 :)
Pattern: Jalie 2921
Fabric: Cotton/Spandex knit from Girl Charlee
Notions: Just thread and seam stabilizer.
Size sewn: I sewed a G (size 3) for my DD and for my self: T in the bust, grading to a U in the waist & a V in the hips.
Alterations/Design Changes: I cut DD's top off at the waist marking & added a pleated skirt. This was my original "vision" Don't be jealous of my mad fashion sketching skillz.
For mine, aside from grading out at the waist and hips, I raised the neckline 1/2" and will raise it another inch next time. I also lengthened it 3/4" and did a double fold 5/8" hem.
Likes: The results are so professional!!
Dislikes: I could have stuck with size T all the way through I think. The sleeves are symmetrical, which is a pet peeve of mine. But, they do seem to have a better fit than other symmetrical sleeves I've sewn.
Time to Complete: Not much! I think mine took one nap time to construct (90 minutes?) and another 20 to hem? Fast.
New Techniques: Rolling the shirt into the collar (the "burrito"). Drafted a pleated skirt for DD.
Total Cost: I had all the notions on hand, so.....about $15 for each.
Fabric: $18 for 3 yards
Pattern: 12.98
Showing posts with label kid clothes. Show all posts
Tuesday, December 31, 2013
Finished x2 Jalie 2921
Labels:
finished projects,
Jalie,
kid clothes
Friday, August 30, 2013
Coordinated Kids' Clothes
It's that time of year again. Some of my readers will remember that I've made my kids matching outfits each summer for our annual District Convention. Well, this year I had three little outfits to sew & I'm happy to say that this year's outfits...by far, are my favorite.
I started out knowing that they would be coordinating, rather than identical. Mostly because my oldest boy, Shawn, has pretty strong opinions these days and prefers to wear red. And by that I mean the only tie he'll wear is the red one I made for him 3 years ago...which is falling apart.
When I found these fabrics, I knew they were exactly what I needed.
But Shawn wasn't sold on the polka dots. And the sailboat fabric was blue--not red.
So I kept looking & we found the winner in a white quilting cotton featuring little red & blue whales. He loved it. Quite by accident we found ourselves going with a nautical theme.
I'll post an individual review of the dress, but here's the outfits. We still haven't managed to get one picture of all three kids together (and I'm not holding my breath!) but we did get some cute individual shots (sorry about the quality & the formatting). I'm happy to say that Shawn will now ONLY wear his whale tie & he's gotten a TON of compliments on it. I had one mom even stop me to ask where I bought his tie so she could get one for her little guy. I felt a little bad telling her I made it :)
I started out knowing that they would be coordinating, rather than identical. Mostly because my oldest boy, Shawn, has pretty strong opinions these days and prefers to wear red. And by that I mean the only tie he'll wear is the red one I made for him 3 years ago...which is falling apart.
When I found these fabrics, I knew they were exactly what I needed.
But Shawn wasn't sold on the polka dots. And the sailboat fabric was blue--not red.
So I kept looking & we found the winner in a white quilting cotton featuring little red & blue whales. He loved it. Quite by accident we found ourselves going with a nautical theme.
I'll post an individual review of the dress, but here's the outfits. We still haven't managed to get one picture of all three kids together (and I'm not holding my breath!) but we did get some cute individual shots (sorry about the quality & the formatting). I'm happy to say that Shawn will now ONLY wear his whale tie & he's gotten a TON of compliments on it. I had one mom even stop me to ask where I bought his tie so she could get one for her little guy. I felt a little bad telling her I made it :)
Labels:
finished projects,
kid clothes
Thursday, January 31, 2013
Finished: Simplicity 2460
This dress started out as my DS needing a new tie. I figured while I was at it I'd make a coordinating dress for DD. One thing led to another & I didn't have enough yardage to make a dress to coordinate with said tie. Poor DS still doesn't have a new tie...but this dress is adorable.
For a pattern, I was looking for a good basic "block". One that I could use again & again with different design details. I wanted sleeves. And a sash. Simplicity 2460 it is. Easy enough. Except for the fact that I only got 1 yard of each of the aforementioned fabrics.Yeah. That wasn't going to cut it. So I turned to my stash. You may remember this fabric from my plans of sewing my own diaper bag (those plans never came to fruitoin...but I did stash the fabric.) Also, this is SO SO long. Sorry about that. I wanted to be very specific for when I sewed this up again. Yes. When. Not if. I love this pattern that much. This is, by far, my favorite dress I've ever sewn for Laila.
Fabric: 2 yards main & 1 of cummerbund & sash. Both are quilting weight cottons.
Pattern: Simplicity 2460
Notions: Thread & zipper
Size sewn: 1, based on DD's chest measurement. The fit is perfect. Which is *almost* disappointing because I was hoping there'd be a little room to grow. :)
Alterations/Design Changes: I didn't cut the middrift on the bias. I figured that'd be cute for a plaid or stripes, but with this print I just decided to save fabric. I also took liberties with the seam allowance. I sewed the sleeves on using 3/8" SA; for whatever reason I just started doubting that they would be big enough. And then I used a 3/8" seam allowance when I sewed the bodice to the middrift...mostly because I was a little less than diligent in transferring my marks so the little cumberbun got caught in the seam line a bit.
Used a 1/2" double fold hem rather than the 2.25" hem that the pattern called for. I just thought that the extra inch or would come in handy :) As it is, the dress hits right below her knee...I might end up adding some contrast trim at the bottom to squeak out a few more months of wear. ;)
Also, the pattern says to install the zipper 1" below the bodice neck. I didn't really want to do a hook & eye so I put the top of the zipper 1/2" below the bodice neckline...pretty much right on the seam line. Worked out just fine. :) And no hook & eye.
Also, instead of gathering the cummerbund, I used elastic thread in my bobbin & shirred it. Then I tacked it down by hand so it wouldn't wiggle around.
Likes: The design details. The sleeve pleats really polish it off. I think it also is a great design for mixing patterns. Often times I fear that mixed patterns scream home made, but I really love this dress. Love the lapped zipper. Easiest. Zipper. Installation. Ever. And it looks so great. I used this tutorial.
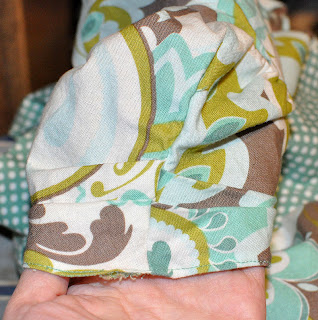
Disklikes:This isn't so much a dislike as it is just getting picky. For the pleats the instructions say "On outside, fold along solid lines. Bring folds to broken lines; pin." I would prefer it say "On outside, fold along solid lines, RIGHT SIDES TOGETHER. Bring folds to broken lines WRONG SIDES TOGETHER; pin." I messed with them for an embarrassingly long time trying to figure out which "look" was better. Sheesh. And with that in mind, I'm pretty sure I did the sleeve pleats wrong. Oh well. At least they're wrong on both sleeves.
I'd forgotten how much the Big 4 love basting. I used TON of thread on this dress. While I was sewing the bodice, I started worrying that I might run out so if one was to look at the inside of the dress you'd see 2-3 different thread colors. I also used my over edge foot to finish the seams.
Time to complete: 30 minutes cut/transfer markings (PLUS tracing time, so probably closer to 1 hour). This is so hard to calculate; I never have much more than 15 minutes of uninterrupted time. Let's see....if I were to make this dress for some sort of occasion, I'd want to give myself 5-7 days to complete it. I came in pretty close to 5 days without too much trouble (remember...this is just in spurts. No sewing marathons for this mama).
Techniques learned: Did my first lapped zipper---LOVE IT. Again, very polished.
Total cost:Pattern was $1. Fabric was stashed, though I imagine I originally spent about $25 on the yardage. Plus zipper & (nearly not enough) thread...we'll call it about $30. Way more than I'd spend on a RTW dress, to be perfectly honest. But it got some fabric out of my stash & that's always a win!
For a pattern, I was looking for a good basic "block". One that I could use again & again with different design details. I wanted sleeves. And a sash. Simplicity 2460 it is. Easy enough. Except for the fact that I only got 1 yard of each of the aforementioned fabrics.Yeah. That wasn't going to cut it. So I turned to my stash. You may remember this fabric from my plans of sewing my own diaper bag (those plans never came to fruitoin...but I did stash the fabric.) Also, this is SO SO long. Sorry about that. I wanted to be very specific for when I sewed this up again. Yes. When. Not if. I love this pattern that much. This is, by far, my favorite dress I've ever sewn for Laila.
Fabric: 2 yards main & 1 of cummerbund & sash. Both are quilting weight cottons.
Pattern: Simplicity 2460
Notions: Thread & zipper
Size sewn: 1, based on DD's chest measurement. The fit is perfect. Which is *almost* disappointing because I was hoping there'd be a little room to grow. :)
Alterations/Design Changes: I didn't cut the middrift on the bias. I figured that'd be cute for a plaid or stripes, but with this print I just decided to save fabric. I also took liberties with the seam allowance. I sewed the sleeves on using 3/8" SA; for whatever reason I just started doubting that they would be big enough. And then I used a 3/8" seam allowance when I sewed the bodice to the middrift...mostly because I was a little less than diligent in transferring my marks so the little cumberbun got caught in the seam line a bit.
Used a 1/2" double fold hem rather than the 2.25" hem that the pattern called for. I just thought that the extra inch or would come in handy :) As it is, the dress hits right below her knee...I might end up adding some contrast trim at the bottom to squeak out a few more months of wear. ;)
Also, the pattern says to install the zipper 1" below the bodice neck. I didn't really want to do a hook & eye so I put the top of the zipper 1/2" below the bodice neckline...pretty much right on the seam line. Worked out just fine. :) And no hook & eye.
Also, instead of gathering the cummerbund, I used elastic thread in my bobbin & shirred it. Then I tacked it down by hand so it wouldn't wiggle around.
![]() | ||
| Lapped Zipper |
Likes: The design details. The sleeve pleats really polish it off. I think it also is a great design for mixing patterns. Often times I fear that mixed patterns scream home made, but I really love this dress. Love the lapped zipper. Easiest. Zipper. Installation. Ever. And it looks so great. I used this tutorial.
![]() | |
| Sleeve Pleats |
I'd forgotten how much the Big 4 love basting. I used TON of thread on this dress. While I was sewing the bodice, I started worrying that I might run out so if one was to look at the inside of the dress you'd see 2-3 different thread colors. I also used my over edge foot to finish the seams.
![]() |
| Gathered cummerbund |
Time to complete: 30 minutes cut/transfer markings (PLUS tracing time, so probably closer to 1 hour). This is so hard to calculate; I never have much more than 15 minutes of uninterrupted time. Let's see....if I were to make this dress for some sort of occasion, I'd want to give myself 5-7 days to complete it. I came in pretty close to 5 days without too much trouble (remember...this is just in spurts. No sewing marathons for this mama).
Techniques learned: Did my first lapped zipper---LOVE IT. Again, very polished.
Total cost:Pattern was $1. Fabric was stashed, though I imagine I originally spent about $25 on the yardage. Plus zipper & (nearly not enough) thread...we'll call it about $30. Way more than I'd spend on a RTW dress, to be perfectly honest. But it got some fabric out of my stash & that's always a win!
Labels:
finished projects,
kid clothes
Thursday, January 24, 2013
Finished: Ella Toddler Dress
I'm sure I'm not the only mom of girls to notice that long sleeved dresses are sorely lacking. Both in RTW and patterns, to be honest. I get the theory; for winter, you put on a sweater. In summer, you go without. Accordingly, sleeveless dresses should give you more wear. Except for the fact that toddlers grow out of said dresses typically before the next season. Yeesh. And, maybe it's just my toddler, but she strips off a sweater like nobody's business. It doesn't matter that she's cold. For whatever reason, the girl just doesn't dig layers.
When I first saw the Ella Dress from Sew Sweet Patterns I really liked it. I've used Sew Sweet Patterns before & they've never let me down. The Ella was no exception.
Here's the run down:
Fabric: The pattern calls for 1 3/8 yard. I used a little more than this to lengthen the sleeves. It's a Rayon shirting for $5 a yard. I originally bought it to make a dress for myself. It's got beautiful drape!
Notions: Thread & buttons
Size sewn: 2T (I think. It might have been 3T...this is why I blog...it's the only way I remember this kind of stuff)
Alterations/Design Changes: I lengthened the 3/4 sleeves to be full length.
Likes: I love the design details; the puff/gathered sleeves & princess seamed bodice. It's enough detail to look professional without being too fussy.
Disklikes: None?? I think I Might have had to gather the sleeves more than what the pattern marks called for, but I can't say for certain. Also, I think the placket instructions could be a touch more thorough. Oh, and my fabric tends to wrinkle. But that is neither here nor there. :)
Time to complete: 2 naptimes?? On & off? I can't be sure. But, not very long. :)
Total cost: About $15? I always buy their patterns in bundles so I got a bit of a discount.
Recommend? Yes! And since the pattern goes up to size 6, I'll probably be sewing it up again!
Labels:
finished projects,
kid clothes
Tuesday, February 14, 2012
Instant Gratification project
That's right, ladies (and any gents who may have stumbled upon this blog), I have a FINISHED project to share! And...wait for it...it only took me ONE nap time to complete!! And that's INCLUDING taking a break to make brownies with my little guy (not from scratch...from a box, obviously...I had a dress to sew!)
After searching high & low for a dress pattern/tutorial with long sleeves to no avail (actually Ottobre has them, but I have yet to decide on just one issue to order), I finally found this tutorial from Prudent Baby (ah--I love them!)
The tutorial included the sizing for 2T & I hemmed & hawed over what measurements to use for my Little, I did measure some of her current dresses but in the end decided to just go with their recommended dimensions. (I had started this dress before, in flannel, but had decided to use my own measurements. It was AFTER cutting out the sleeves that I realized that they were Raglan, not set in like I measured. Yeah. I probably could have salvaged it, but I just threw my hands up & walked away)
I'm pretty happy with how it turned out. I don't like the way it balloons out at the bottom, I should have went with my instinct & took some of the width out, but other than that it is pretty cute.
I bought the corduroy from Joanne Fabrics, despite my hesitation. the last time I bought corduroy from them it was so off grain that it was un-useable. Ridiculous. But this particular corduroy seems to be good quality & it made me wish I had bought a bit more yardage.
So there we have it. Next up on my to do list is to trace a couple of patterns for knit tops for maternity. I'm also compiling a list of fabrics to order once payday hits ;)
After searching high & low for a dress pattern/tutorial with long sleeves to no avail (actually Ottobre has them, but I have yet to decide on just one issue to order), I finally found this tutorial from Prudent Baby (ah--I love them!)
The tutorial included the sizing for 2T & I hemmed & hawed over what measurements to use for my Little, I did measure some of her current dresses but in the end decided to just go with their recommended dimensions. (I had started this dress before, in flannel, but had decided to use my own measurements. It was AFTER cutting out the sleeves that I realized that they were Raglan, not set in like I measured. Yeah. I probably could have salvaged it, but I just threw my hands up & walked away)
I'm pretty happy with how it turned out. I don't like the way it balloons out at the bottom, I should have went with my instinct & took some of the width out, but other than that it is pretty cute.
So there we have it. Next up on my to do list is to trace a couple of patterns for knit tops for maternity. I'm also compiling a list of fabrics to order once payday hits ;)
Labels:
finished projects,
kid clothes
Tuesday, July 19, 2011
Finished! McCalls 5791
As promised, here are some more pictures of the kiddos in their new duds. You'll have to forgive the so-so photos, they were taken with my point & shoot and despite them all being taken within an hour of each other, they were an odd combination of over & underexposed. Sigh
The dress & tie turned out beautifully, if I may say so myself. The pattern itself was quite straightforward. Which provided me opportunity to use a more challenging fabric. And challenging it was. I didn't have too much trouble with slippage (the glitter took care of that) but it frayed like crazy. I have to say, this dress was made possible by Fray Check. Thanks Dritz!!
I used this dress as an opportunity to try a couple new (to me) techniques. I think children's clothes are a good time to practice for a couple reasons. 1) Children will likely outgrow the clothes before they fall apart. 2) The cuteness factor. Cute kids & babies make up for any shortcomings the garments may have 3) Kids are always on the move. No time to closely examine things like zippers & hems.
That being said, I inserted my very first invisible zipper on this dress and I must say, I think I prefer these over lapped & centered applications. I can foresee, however, having troubles with bubbling at the bottom of the zipper in the future. We'll cross that bridge when we get there.
Also, french seams! The dress is fully lined, with the skirt lining being free-hanging. I love the results of the french seams & I only had to rip one out after sewing it on the right side. D'oh!
I also slip stitched the bodice lining to the zipper & skirt. And I'm pleased with how it turned out. I had enough confidence that I skipped the transparent thread. My consistency has improved dramatically. You can tell when looking at it when I took a break from sewing & came back to it, but all in all, it looks quite nice. My mom even told me so.
As for the hem, I did a lot of looking at blind hemming techniques & even practiced on a few scraps of fashion fabric, but int he end I decided that it requires too much pressing and I feared scorching the dress on the very last step. On the other hand, I did not want to do the typical double turned hem. The "sportswear" finish would just not do for this little dress.
I remembered from the serger class I took last month that a delicate finish can be obtained by using a 3 thread stitch. So that's what I did. :) And I really like the results.
You can see pictures of the dress & tie unadorned (without the models) here.
..........
Labels:
finished projects,
kid clothes
Thursday, July 14, 2011
Sneak Peak
Ok. The dress & tie are both offically finished. I thought I'd post a sneak peak since I've been so scarce lately. :)
We're leaving for the convention tomorrow morning & the kids will be wearing their new outfits on Sunday, so I should have some modeled pictures next week.
Here's the front of the dress. I debated whether to leave the tulle stick out or lop it off & decided that I like having it peek out a bit. Though it does look lopsided in these pictures.
And here's the back (see the invisible zipper? No? Awesome!)
We're leaving for the convention tomorrow morning & the kids will be wearing their new outfits on Sunday, so I should have some modeled pictures next week.
Here's the front of the dress. I debated whether to leave the tulle stick out or lop it off & decided that I like having it peek out a bit. Though it does look lopsided in these pictures.
And here's the back (see the invisible zipper? No? Awesome!)
Here's the label I designed for this dress. I think I enjoy designing the labels just as much as sewing the clothes. :)
And of course, a matching tie for the big brother :) With coordinating label, I must add.So there you have it. A quick look at what has had me chained to the sewing machine this last week. I'll post all the nitty gritty details next week.
Labels:
finished projects,
kid clothes
Monday, July 11, 2011
Lots of progress but nothing to share....yet.
I feel like I haven't blogged in forever. It's not for a lack of things to say, that's for sure. It's just that every time I sat down to blog last week, I though "I should be sewing, not blogging about sewing." So, that's what I did.
And my little doll's dress is almost done (with my very first invisible zipper). All that needs to be done is hemming. And I think I'm going to try using a blind hem. That will make for lots of firsts on this little dress. My first invisible zipper, first use of french seams. First time using tulle. More on all that later, though.
Shawn's matching tie is finished, done in less than an afternoon. I swear, you spend more time turning & pressing than actually sewing when it comes to ties. It was a nice change of pace.
So, lots of unveiling to come. But for now...back to the sewing machine.
Labels:
kid clothes,
Snippits
Saturday, July 2, 2011
Sewing for Children Contest: Entered!
Despite the fact that July is a busy month for us & despite the fact that I've enrolled in another class at PR (Fun with Fitting Skirts), I've decided also, to enter the Sewing for Children contest. In fact, I just officially entered.
I already had some clothes for the kiddos at the top of my to sew list, so I just held off to start until the 1st so I could be eligible for the contest. It runs until August 31st, but my own deadline is July 15, which is when the kids will (hopefully) be wearing their new clothes. That gives me just under 2 weeks. Which should be plenty of time. We shall see. My already cut out maxi dress may have to wait, though.
I've menioned before, that we have an annual 3 day conveniton that we attend in the summer. Last year, I made the kids coordinating outfits. A sweet little pillowcase dress for Laila & a matching tie for Shawn. This year, I'm stepping it up a bit. :)
I'll be using McCalls 5791 for Laila's dress & diaper cover in a blue glitter polyester special occasion fabric. Shawn's tie will be the same shade of blue, minus the glitter.
I also bought 2 zippers for the dress-one invisible & one conventional. Ideally I'll get to use the invisible zipper, but just in case that proves to be too stressful, I can hand-pick the conventional zipper and still get a nice finish. I'm also toying with making matching shoes for Laila...but that just might be overkill. :) Then again, what better time to go overboard, right?
Labels:
kid clothes
Wednesday, June 1, 2011
Toddler Dress Clothes--Finished!
My little guy (and my big guy for that matter) wear suits a lot (well, it doesn't seem a lot to us, but compared to most guys--I suppose it is.) We attend Christian meetings twice a week & work in our ministry 1-2 every week, so my little boy wears a lot of suits. Typically, his dress clothes consist of slacks & a button down shirt, sometimes with a suit jacket or vest.
Needless to say, my boy is growing like a weed. And buying new suits gets expensive. They are hard to find in the first place, and he's getting out of the sizes where they sell "sets" with pants, vest, shirt & tie. So I made it my mission to find patterns for my little guy.
The pants were easy. The extremely talented (and generous!) Dana from MADE has been so kind as to share a pattern for kid pants. I've sewn these up twice now (both with a flat front) and I love how they fit. The legs are slim & make my little guy look oh so grown up! Not to mention her instructions are easy to follow & straight forward. Thanks Dana!
Finding a vest was more challenging. I spent quite a bit of time trying to find resources on-line for toddler suit vests. I did find one helpful tutorial that explained how to draft your own vest from a dress shirt. That was very helpful, but I really prefer patterns at this point in my sewing. They make me less nervous. Anyway, I came across this vest pattern from Jocole on Etsy. And we all know how much I love PDF patterns. I didn't hesitate before buying it.
Labels:
etsy patterns,
finished projects,
kid clothes
Monday, May 9, 2011
Finished! Toddler Hoodie
Hi! If you're here from allfreepatterns.com, I have to tell you there is no free pattern linked in this post. I'm not sure how my post got submitted to them, but I'm trying to get it removed from their links.
When my husband saw the Heidi & Finn Unisex hoodie pattern that I bought for the kids--he loved it. Until I told him I was going to make one for Shawn. He insisted it was much too girly for that. So, I went ahead & let him pick out a fabric to make a hoodie for Laila. He picked an adorable black & pink plaid woven. At the time, I didn't really know the whole knits vs. wovens thing, so when I brought the fabric home & did some research, I realized that a knit fabric really would function better (so the black & pink plaid remains stashed). Also, at the time, I was afraid of knits. So, the pattern got put aside.
Fast forward to Celebrate the Boy month at MADE. Lots & lots of goodies, including the Unisex Hoodie Pattern!! And let me tell you, these hoodies just scream "BOY". I found Emily's version particularly awesome.She was sweet enough to include a tutorial on inserting the zipper.
This project came together super fast; the instructions were excellent. I did have significant trouble with the zipper (which is not the pattern's fault, since it includes button closures). Mostly, I'd sew it in, decide I did it wrong, rip it out & then realize that I was right the first time. D'oh. I found the zipper tricky for a number of reasons.First off, I don't really know how to do a zipper. Second, this zipper isn't inserted the conventional way. Third, my fabric was a pain. Both the outer shell & the lining are super thin & unstable. Nevertheless, as long as you don't look too close, it's fine. You can find my "offical" pattern review here.
And the end result? Well. It's anything but girly.
Labels:
etsy patterns,
finished projects,
kid clothes
Subscribe to:
Posts (Atom)