Pages

Showing posts with label baby clothes. Show all posts

Thursday, June 7, 2012

Finished: For Baby


I can't help but say "Awww..." every time I see this little sleeper.  It's actually a muslin, before I set out to make my final version for the coming home outfit for my little guy.  I had very a very specific design in mind when I set out to find a pattern.  I wanted it to have a zipper. And it was a bit of a challenge to find one.

I found KS 2246 on Etsy for $3 & snatched it up! The front & back of the pattern are one piece, cut on the fold. It was the most bizarre pattern piece I had ever seen, and I really struggled to figure out what would go where. I did have to rip a couple seams along the way but all in all it turned out pretty cute!

I got the fabric from Joann's clearance section--it's really thin, but it served its purpose. For the final version, I'll use this fabric from Spoonflower.  

Neckline Ribbing with gap :(
The ribbing at the top of the zipper had me stumped, but I was making it more complicated than it should be :) Next time I sew it, though, I'll move the zipper up a 1/4" to avoid the little gap at the top (if I'm smart & read this blog post before I sew it again, that is--I should make a note on the pattern instructions to be sure...). 

This is size Small (0-3) but as I suspect, it's a bit big. The back of the pattern says it'll fit 24 inches long & 13 lbs.  And it looks comparable to the 3-6 month RTW sleepers I have.  Needless to say, my newborn will be swimming in it...but I'd rather it be too big than too small. Shawn's coming home outfit was too small & it almost broke my heart. :)


Wednesday, April 11, 2012

First Baby Project


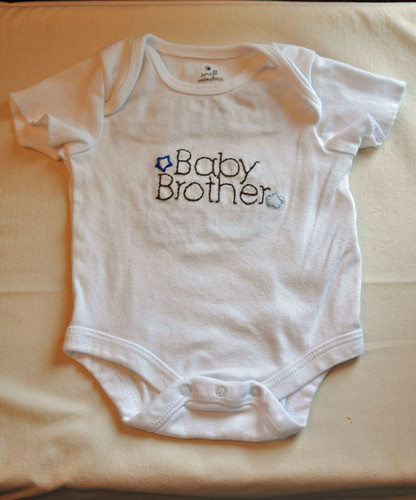
Ok, it's not sewn, but it is a project! I've been dabbling in embroidery--just working on flour sack towels & the like & decided to try my hand at a onesie.

The front says 'Baby Brother' (as you can see) and I put a couple little stars on there, too. On the back, I put our last name along the top & the number "03" in the center--like a jersey. I made the design in Photoshop Elements & printed it out. Then I traced it onto vellum using a transfer pen. Then I ironed it on & voila! SO CUTE. The transfer pen warns that it is permanent, but I found that there are only traces of it left on the back of the onesie, where the design was quite dark.

Embroidering on a knit can be a little like sewing with a knit--tricky.  I used the t-shirt stabilizer (also from Sublime Stitching--can you tell I'm a fan??) & found it to be very helpful.  There were a couple times that I had trouble, but it was a dull needle that was the problem.

I bought some little burp rags (the cloth diaper type) and I'm trying to see what I can find for solid colored onesies for some more embroidered goodness!  I'm also gearing up (hopefully!) to making quilts featuring embroidered blocks for both my oldest son & baby girl. :)  I've just got to decide on a pattern/design! :)

Friday, June 24, 2011

Baby Dresses


A friend of mine has a 2 year old granddaughter. She had bought a couple patterns & fabric to make some dresses but just never got around to it. When she found out that I sew (and that I enjoy it!) she asked if I would mind sewing up the simple patterns. I was kind of between projects, so I said sure.

She had picked out New Look 6576 & 6878.  The Cherry dress (6576) came together super easy & I love how it turned out. I really wanted to find cherry buttons (though, it may have been overkill) but couldn't find any that didn't look like tomatoes. So I stuck with boring old white buttons & used red thread for the buttons, buttonholes & hem.


6878 was a little more challenging. It has a zipper closure--which I did "by the book" and am pretty happy with how it turned out.  The "hard" part was attaching the yoke facing. The directions say to press the raw edge if the facing in 3/8" and sew on the outside in the seam (that attaches the facing to the dress). Theoretically catching the 3/8" hem on the inside. I'm just not that precise in my sewing (yet?) so, I whipped out my handy dandy transparent thread & sewed that baby  by hand. I think it saved me a lot of heartache in the long run.

So, now there done & on their way to their new owner. My friend asked me how much I wanted for payment & I have no idea. I had it in mind as a favor, and I didn't spend hours & hours on them or anything. They were kind of nice projects to do since they weren't real challenging & I didn't have anything else immediately lined up.

Monday, May 2, 2011

A Whole Lotta Cuteness....

I have to start of by saying that I'm sorry I missed my "Sewing Room Makeover" post last week. The kids & I were down with this cold that's been going around. And also, when I was feeling up to "activity" (and the kiddos were willing to allow it)--I had funner projects that took precedence.  

Four fun projects as a matter of fact.   Want to see the first one?? I know you do. :) Fair warning: this post may qualify for what they call "Pic Heavy". I just couldn't narrow down the cuteness. Miss Laila has that effect on me. 


It's a baby headband!!! Made out of....old t-shirts!! The black band is just a strip of an old paint-stained Hanes t-shirt (which interestingly enough, had no side seams). The pink & white rosettes are both from some sleeveless, hoodie, zip up t-shirts (they sound weird, I know) that are now too small. Which is really interesting since I'm the "smallest" I've ever been. Maybe they shrunk. But it's more likely that they were too small to start with, since looking at old pictures has made it clear that I habitually wore clothes that were on the small side as a teenager. Those pictures I will not be sharing. You're welcome. 


I used a couple different "techniques" for the roses. For the pink rose, I used (more or less) this tutorial. For the white rose, well, I just rolled that baby up and sewed it together. I much would have preferred to use my hot glue gun, but, alas, it has disappeared. Or been hidden. Our 2 year old thinks its a fantastic toy, so we hide it. And thereby lose it. Which leaves me no choice but to hand sew cute little flowers for t-shirt baby headbands.

As for the little ribbon, I basted long edge of it (using pink thread) and then gathered it. After that I just wrestled with it until I liked the results. Then I hand sewed it. At which point I had to continue wrestling it into submission. Oh, how I miss my hot glue gun.

I sewed (again, by hand) the rosettes to each other & then to thin t-shirt strip and sewed that to the headband.   

As for the headband itself, I just cut a strip (from my old t-shirt) about 3 inches wide (or tall, I guess) by 17 inches long. I serged one short end & the long ends together & turned it inside out (which reminded me to add 'loop turner' to my --already incredibly long-- JoAnn shopping list).

And I leave you with this--my absolute favorite shot from our T-shirt Headband Photo shoot

Tuesday, October 12, 2010

Complete! Simplicity 2572


Alright! My first official project using a Big 4 pattern. It turned out well, could have been better but I wanted Laila to wear it to our weekend assembly, so I was on a time constraint. I took one week to do the jumper, hoodie & diaper cover. Looking back, I'm a little surprised I finished it, because I know that I even took a couple days off from sewing.


The jumper went together pretty easily, the neck & armholes are bound by bias tape, which was a challenge, just because baby neck & armholes are so tiny. I even did my first zipper.

I sewed size XS which is rated for 1-3 months & 7-13 lbs. The hoodie has some room to grown, but the jumper...it's a little short. Which is understandable since it is a jumper, not a dress & Laila is pretty long. Comparing it to a RTW size 0-3 months shows that they are just about identical.


The hoodie was a real challenge--in a good way. Mostly. There is a place or 2 that I caught some of the jacket in the seam when I was attaching the hood, but I didn't re-do it simply because I knew it would become a wadder if I tore out one more seam. And Laila would likely grow out of it before I even got the ambition to fix it. So, I left well enough alone. And no one has been the wiser. In fact, people seem shocked that I made the outfit. I just love it when that happens.

Friday, September 10, 2010

Kylie Dress

Well. It's done. And I'm glad. I'm less than pleased with how the back of the dress looks; I had anticipated there would be some issues there, but with the placket confusion I had hoped I was wrong (Lesson learned: trust my sewing instincts, as untested as they are).
The front looks nice though & the print of the fabric is ok. As much trouble as I had with this pattern, I do think I'll give it another go, especially since it's sized all the way up to 6T. All the issues I had with it are remedied now that I've actually done them. The e-book does have one (very) misleading illustration and then there is the blatant lack of placket description, but there's no lesson like experience, so I'm hoping for a much smoother encounter the next time around.
I love the lines of this dress & I think it would look great in a special occasion fabric. Maybe even with a translucent overlay. Anyway, enough talk. Time for pictures.
The dress front:

Here's a closeup of the back wonky-ness. See how the bodice is cock-eyed? Sigh.

And TA DA! Here is my placket, which I find very functional, by the way. I just can't beleive that the instructions didn't go into the construction of it more thoroughly. Had it not been for the gals over at PR, I wouldn't have been able to figure it out. Guess that means I need another sewing book. The next time I do this dress, I'm planning on doing a tutorial on the placket since I couldn't find any.


I got a lot of compliments on the dress at meeting & I just smiled & said thank you. No need to point out it's imperfections. So, here are some lessons the Kylie pattern taught me:
  • Obviously, the placket
  • Using a slip stitch. I had never done this before & had to look it up to attach the bodice lining to the skirt. My stitches started out downright ugly, but improved significantly towards the end (not significantly enough to share pictures, however)
  • Slip stitching Velcro is the pits. Really. Had I read the instructions a little more thoroughly I would have seen that they suggested the iron on kind. Of course. Otherwise you see the stitching on the back. No problem, I now know how to slip stitch. It was more work than I anticipated, but the results are so much cleaner.

Wednesday, September 1, 2010

Project in Progress Sneak Peak

I can't wait to get this put together and see it on my little girl! The first picture is linked to the shop on Etsy that sells this pattern. I've used on of their patterns before (the Harper dress--details to come) and let me just say that their patterns are truly wonderful! I did contact the seller at one point with a question & she was incredibly helpful & responded within minutes. She (Angi) was also kind enough to check in with me a couple days later to see how things were coming together. I will definitely be purchasing from them again. Kylie Dress PatternMichael Miller's Round About in Orchid
Related Posts Plugin for WordPress, Blogger...