Pages

Monday, April 25, 2011

Vintage McCalls 6179: The Alterations & the Verdict


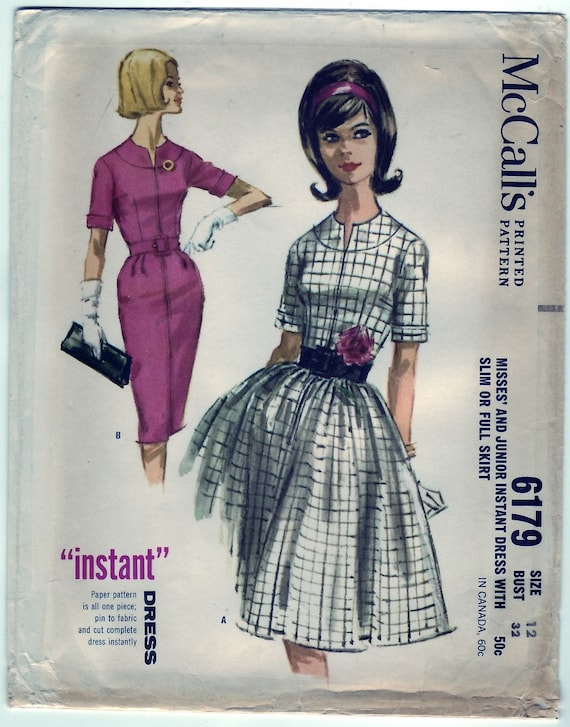
As you may have guessed, the general silhouette of clothing (and thereby, women) was different in 1962. This pattern's bust measurement matched my own, but the other measurements were a different story completely.

The waist measurement is 25" (mine is 28) and the hip measurement is 34, while mine comes in at 37".  To determine how much ease the pattern has, I compared the flat pattern measurements to those printed on the pattern envelope. The results:

Bust: 1.5" of ease
Waist: 2"
Hips: 2"

Which meant that I needed the pattern's final measurements to be 1.5-2" larger than my actual measurements to allow me some breathing room. :)  In total, I needed to add 2" to the waist & hips. Which amounts to 1/2" at each side seam. Just for good measure, I added 1" seam allowances. Just in case. 

I sewed up my muslin, and it looked pretty good, but I was concerned that there would be too much strain on the zipper in the waist area. I let out the waist a smidge (5/8" per side seam). Then I put the zipper in. (I'm so proud of myself, I put it in by hand-using Tasia's tutorial) Once I put the dress on, I realized it looked a little...frumpy.  After consulting with Austin (my husband/fashion consultant) he stated a few things:

"The fabric is...pretty boring" This is just my muslin, picture it as hot pink with white polka dots.
"It looks unfinished" It is unfinished, honey. This is the practice version. Use your imagination.
"It seems too long" I agree. I'll take the hem up a bit. 
"I don't know, It just doesn't show any curves."  


Bingo!! Now, I consider us some-what conservative. That & my clothes need to be comfortable. I'm chasing after 1 (if not two) children at all times, it seems. I don't do skimpy. Or skin-tight. But, that being said, I was envisioning this dress to be a little more...Joan (just a little!!). So, I put the waist seamline back where it originally was & shortened the hem line. By 2 inches.

And it is better. But it is not quite what I have in mind. The very design detail that I first fell in love with, the yoke, is it's down fall. And the sleeves aren't helping any, either.  I've done a lot of thinking about this & I just don't know that I would grab this dress out of my closet. There's just something about it.  Maybe it just isn't "me".

As sad as I am to see that this particular dress won't work for me, there were a lot of good things that came from the time & energy I put into the muslin.

I no longer fear vintage patterns. In fact, I found this pattern's instructions to be very straight forward & easy to follow. Also, it was easy to add inches where they needed to be.

I did my first hand-picked zipper & it turned out wonderfully. I also have a new outlook on muslins. This cheap, boring fabric saved me from cutting into (and ultimately, wasting) my chosen fashion fabric. 

All this talk & not a single picture of my muslin. Consider it a favor ;)  I do have quite a few smaller projects in my que, so there should be some finished objects real soon.

Friday, April 22, 2011

Sewing Room Make Over: The Patterns

The first thing that I realized I needed to organize was my patterns.  My stash keeps inexplicably & spontaneously growing. And as I sew through my patterns, I realize that they end up bigger than they were originally. Especially since I prefer to make tracings, rather than cut the originals.

This thread on Pattern Review has tons of ideas & tips for storing & organizing your patterns.  I decided to implement this system.  But I keep my pattern pieces (and tracings) in 9x12" manila envelopes, and my pattern envelopes & instructions in a 3 ring binder.

My favorite thing about this system is that I can easily flip through my pattern stash. If I want to make a dress, I just open up my binder, turn to the pertinent section & shop away.  It's easy enough to slide the pattern envelope out to see what I need for notions & yardage.

I had a small quantity of the supplies that I needed already on hand. So before I fully implemented this plan, I used what I had as a practice run.  Here's what I used:

3 ring binder
9x12" manila envelopes
Sheet Protectors

After I was sure this would work for me, I went ahead & invested in larger binder(s) from Costco, as well as a couple more packages of manila envelopes.

I separated my pattern tissue & placed it in a labeled manila envelope. If it was pattern that I've used, I put my tracings in there, too. Also, if I made any alterations or construction notes, I slipped that page in there as well. I keep these in a space separate from my sewing space...I happened to have this box on hand.


The pattern instructions themselves stay with the pattern envelope. I decided to do it that way in case I wanted to look over the instructions real quick to see how involved the pattern is.

Then the pattern envelope (with instructions) is placed in it's own sheet protector within the binder. Easy Peasy.The only thing that I dislike about my binder is that there is so much extra room within each sheet protector.  It's a small thing, but I wish they fit more snugly rather than sliding around while I'm flipping through.


So there you have it. My new & improved pattern organizational system. How do you keep your patterns from taking over your house?

Tuesday, April 19, 2011

Just some sewing ramblings

It's been quiet around here on the blog front, but there have been some going-ons in my sewing space, I assure you. I figured I'd do one overview rather than 3 or 4 short posts. 

Vogue 8669- This should have been done, like, weeks ago. :) Really, all that is left to finish it up is to attach the sleeves & hem it.  I kept putting it aside because I didn't want to re-thread my serger. So, what have I been working on, you ask??


McCalls 6179- I saw that the Vintage contest on PR was going to start May 1st & I thought it would be a great opportunity to have some extra help from the other ladies that are participating. I haven't officially signed up, but my muslin is nearly done & it's looking pretty promising. I dare say, it looks much better than my Crepe ever did.

I'm sewing View B, the wiggle dress. It fits great in the bust, but I had to enlarge the pattern by 2 inches at the waist & hips. And even then, I'm going to have to let out the side seams at the waist another 1/2" or so.  I'm so glad I used 1 5/8" seam allowances on my side seams for the muslin. It seems that I just might be learning from past mistakes. :) 

As for fabric, I decided early on that I was going to avoid solids. Prints are just so much better at hiding sewing mistakes & figure flaws. I've been keeping an eye out for floral, but I just love this polka dot from fabric.com. I haven't ordered it yet, but I'll probably push the button later today. Also in my cart is a purple jersey knit, some tricot yardage (for a full slip!) and some elastic thread.  While I'm at it I'll probably throw in some wooly nylon thread, too. 

 Pattern Drafting: I ordered Don Mccun's book How to Make Sewing Patterns & have given it a quick look through. I really like it. The writing style is laid back without being overly casual. I probably could have waited a little longer to add this to my library, as it is a little more than I'm probably going to need right away, but it will be nice to use if I just want to make a simple adjustment to a commercial pattern. 

Sewing Classes:  I'm going to be taking my first official sewing class later this month.  There's a little sewing (and scrapbooking) shop that opened up this last month (yay!) and she'll be offering classes. I just signed up for the apron class, even though I've made aprons & honestly, I feel like I've "been there, done that" as far as teh skills required. However, one can never know too much, and also, I'm kind of scouting to see if maybe I'd liek to take private lessons.  That & I feel very strongly that I need to support this local business. The closest Joann is 45 minutes away from where I live & there are no shops any closer than that. 

Also, I've been watching the on-line classes at PR. They have a couple that I'm consdering coming up. The first one, Break Your Serger Out of the Box, is a basic serger course.  I feel like my serger & I have a love/hate relationship.  Of course, I felt that way about my sewing machine, once, too.

The other course starts in July & it's all about fitting skirts.  It even covers drafting & modifying your own skirts. Very tempting. 

Well. This post turned out much longer than I had expected. :) 

Friday, April 15, 2011

Sewing Room Make Over: Before

Actually, maybe this post should be titled "Sewing Space Makeover" since I lack an actual sewing room.  I've carved out a sewing nook along a wall in my kitchen, and since my kitchen is quite large (and the nicest room in the whole house) it works out quite well.

Mostly. Except for the fact that my upper sewing cupboard looked like this most of the time:

Yikes.

Granted, the doors were closed. Usually. But what a mess! I'd go in there to grab something and everything except for what I wanted would come at me. I'll walk you through the mess. On the very top you'll find 2 bolts of quilting cotton to make my sister in law a clutch.  On top of those bolts are the kits I bought to make said clutch. Why do I have entire bolts of fabric?? Well, my mother in law used to own a quilt shop & when they closed she kept a good part of the stash. Which I raid. And I usually bring home entire bolts since I typically don't know how much yardage I'll need. Also on the top shelf you'll find black serger thread, a little vial of oil for my serger & also my measuring cup that holds water to refill my cheapy iron.

Ok. Next shelf. Left to right. In the very front, yes, those are craft paints. Not sewing related, but I needed to get them out of my toddler's reach quickly. You understand.  Behind that are my sewing books (the ones that aren't stacked next to my glider, that is). Then my patterns, and lastly my stack able notions holder. Stuffed in there haphazardly is some belting yardage.

Ok. Bottom shelf. (Nearly empty) Spray starch in  the front, behind that are manila envelopes that hold patterns & tracings that I've already sewn.  Next to that are my Threads & Sew News magazines. Then there's the gallon ziplock bag stuffed with assorted elastics that my mother in law gifted to me (there's actually another bag, too, I think that's in the bottom cupboard...with my fabric. Why? I don't know.) And finally my cute little sewing basket with a nearly useless thread holder (that has since been retired) thrown on top.

So there you have it. 

I like organization. I really do. But I get overwhelmed by the process.

That being said, I've come up with some plans, and I'm excited to say my sewing space looks much, much better. I'm quite proud of myself, so, if you don't mind, I'd like to share what I've done. Stay tuned for the rest of the weekly series, where I'll share what I did with my patterns, magazines, notions & fabric to make my (sewing) life a little bit easier.

Thursday, April 7, 2011

In Progress: Vogue 8669


I started on View A of Vogue 8669 (the sleeveless version). But I have plenty of fabric & decided that flutter sleeves would be a cute & easy addition.

I was wrong. Sort of. I still maintain that they will/would be a cute addition. But this seemingly simple drafting alteration has left me nearly pulling out my hair. It first went wrong when I slashed & spread clear up to the cutting line. It should have been only to the seam line. No problem-easy fix. So I re-did it. But I'm still not getting the sleeve cap to fit into the armscye. I've never had trouble setting sleeves. But to this rookie, the sleeve cap & armscye look to be two completely different shapes. Hoping that it has something to do with the way the shoulders are gathered, I tore out my basting stitches (I just basted everything to get an idea of fit and construction) and am re-doing it. Also, I gave in & ordered Don McCunn's pattern drafting book and it is on it's way to me now. Maybe it will give me a bit of insight.

V8669 is an incredibly easy pattern by itself. I certainly would have finished it long ago had I skipped the sleeves (or even used the drafted sleeves.) But now it's a matter of pride. I am simply determined to have flutter sleeves. Stay tuned. I'm not sure how this one's going to turn out. :) Worst case scenario, I will be forced to surrender and go sleeveless.

Monday, April 4, 2011

Finished! Burda 7866

Remember when I ran out of thread for my cardigan?? I went to Joann for 2 spools of thread. And only two spools of thread. But somehow I found myself at the check out line with 2 spools of thread, 2 new Burda patterns & 2 yards of fabric. Please tell me I'm not the only one this happens to. 

I can't complain too much, though. Here's the end result:


Meet my version of Burda 7866. Cute, huh? This pattern has actually been on my wish list since I started sewing, but I hadn't ordered from anywhere that carried Burda pattners. When Joann started carrying them I knew it would soon be mine.

I cannot believe how quickly this baby came together. Would you believe that the front & back are all one piece?!! There are no shoulder seams. There's just one seam going up the sides & arms.  Then there's the bottom yoke, which is 2 pieces that you attach to the main piece.

I spent more time figuring out the tension on my serger & turning the 111" long belt than I did actually sewing this top. It would be a great afternoon project.

The only confusing part was attaching the neck facing.  I just ended up attaching it with my regular sewing machine (with right sides facing--using a 3/8" seam, I believe), folding it in & then top stitching it with my double needle.

Next time I sew this (and yes! there will be a next time) I'm going to deepen the neckline at least an inch. In the pictures, it's riding up (as it tends to do) and it feels a tad choking. That & I have a semi-hard time getting it over my big hair, I mean head. I think this top would be fabulous in a purple swirl print.

I love the belt, but it makes this top very un-breastfeeding friendly, so I'll probably put it aside for a bit. :)
Related Posts Plugin for WordPress, Blogger...